Home Lab for Skills Buidling
-
Hello Everyone!
I hope you've all had a good holiday season!
I am starting a journey of setting up a virtual Home Lab and wanted to write down my thoughts, challenges and triumphs here on the ITPro forum to help encourage others to do something similar and to just document what I'm doing. I will try to make references to on the "why" I am performing a task a certain way by posting screenshots or links to material related to this practice. I recently passed my Server+ exam (Thanks Ronnie and Wes!) so there will be quite a bit of reference to that material.
I would love any feedback of my choices of how I setup my hardware and environment. I welcome any and all questions and will try my best to answer them!
This will be episode 0: Hardware choices, Purchasing and OS Planning.
I have been gifted an "Evergreened" Dell Optiplex 7040 SFF desktop. This device was used within a corporate environment for roughly 5 years and was replaced because it is now out of warranty and the company has a policy in place replace devices after a certain number of years. This is important to help mitigate potential downtime due to faulty hardware. This is in relation to the exam objective of the CompTIA Server+ exam "Explain the importance of asset management and documentation."
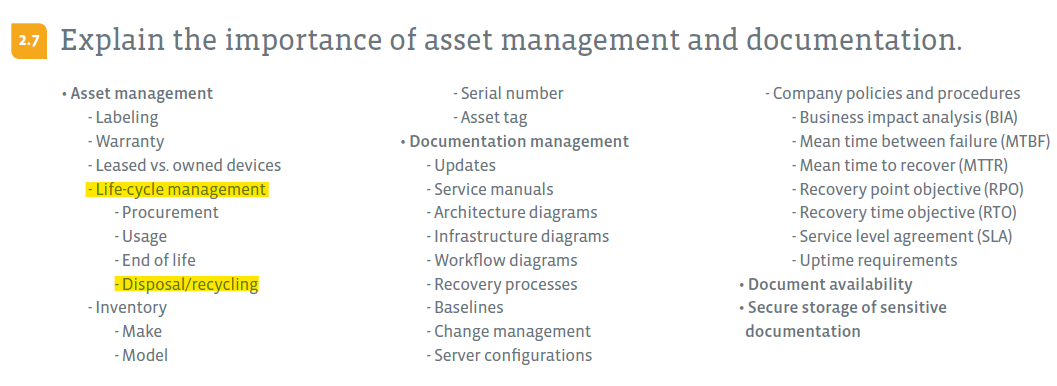
Since this is an Evergreened machine, it did not come with any RAM or storage, no doubt to help reduce the risk of important company data falling into the wrong hands. So I had to go find my own RAM and storage solutions. Below are the hardware selections I made:
Storage: WD Blue SN 580 1TB NVME
RAM: Corsair Vengeance LPX DDR4 3200MHz 2x16GB 32GB kit.
The reasoning behind the purchase of these hardware components was quite simple:
-
This desktop will be for virtual machines so I want fast storage for fast booting of the host OS or Hypervisor itself as well as the VMs. I will be running multiple VMs at a time so I will require a large amount of RAM to run them simultaneously.
-
These items were on sale. This is meant to be a learning device so I do not need the best of the best.
I originally wanted slower RAM, but slower RAM sticks are hard to find new in my area. Luckily, according to the documentation of the Dell 7040 this RAM speed should be compatible with its motherboard so I will get to use the RAM at its full speeds. Since this kit is a 2 DIMM kit I also have future growth potential by adding 2 additional DIMMs down the line and maxing out the RAM at 64GB. 32GB though, is more than enough for now. To enable the faster RAM speeds you usually have to enable XMP profiles within the BIOS/UEFI.
Operating System
The operating system is where I have some choice. I have had experience in the past with using Windows Server 2022 at my previous job and I use it for my local Plex box. This time I am considering using Proxmox Virtual Environment as the Type 1 hypervisor and then installing Windows and Linux VMs within it simply because I have never used Proxmox or a Type 1 Hypervisor before. I have used Hyper-V on my gaming desktop with Windows before but that's about it. I am curious to see what people here might think and hear your thoughts on this choice. I would consider using just straight Windows Simply for the practice to use Hyper-V. I don't want to consider ESXi because of what has happened to that platform since Broadcom completed their purchase of VMware.
Conclusion
This is where I will leave it for today. I will contemplate over the next day or 2 on what OS to choose. Leave me your thoughts on the hardware I am using, what OS/hypervisor I should use and anything that I may be overlooking.
Thanks for reading!
-
-
VM Host on a budget! Great project to use that little Optiplex for.
85 CAD = $65 USD for NVMe Storage (WD Blue SN 580 1TB NVME) 90 CAD = $67 USD for RAM (Corsair Vengeance LPX DDR4 3200MHz 2x16GB 32GB kit) ------------------------------------------------------------ 175 CAD = $132 USD so far! -
W wes-bryan referenced this topic on
-
Hi Andrew,
I think this will be a fun project. I share your opinion on the recent VMware change. I think Proxmox would be a great Hypervisor to start with. There is a lot of videos and guides on setting it up so there are resources available. I have used it in a limited capacity before, but plan on using it again. From my experience its user friendly and allows you to expand into containers if you are interested in that. That way you can have your full VMs and possibly have some containers running for specific services you may want. I think it gives you a lot of options to work with. Now for Windows its one of those options that just work. I know other professionals that user Hyper V just because it comes with the Windows OS and you don't have to purchase an additional service.
Below I have included a couple of videos from youtube that are very helpful and provide up to date install guides.
Links:
https://youtu.be/5j0Zb6x_hOk?si=6cxBuxh6rqzBUBba
https://youtu.be/sZcOlW-DwrU?si=5R7Zbx4o8S_nRmhe -
Thanks @Ronald-Robinson !
I think I'll definitely give Proxmox a try. If in the end I find it too cumbersome to work with I can always start again and do a Windows Server 2022 install anyways. The whole point of this exercise is to learn anyway :p
Thanks for the videos! They will definitely come in handy :)
-
Update time!
Note: I found an old Samsung 256GB 2.5" SSD in my parts drawer and installed it into the Dell Optiplex. I am using it as the boot drive so I can fully utilize my NVME drive for VMs.
Episode 1: OS Choice, Installation and initial configuration.
After the post by @Ronald-Robinson, I did decide to take the leap into an entirely new OS, Proxmox. Below is a description of Proxmox Virtual Environment (VE) direct from their website for those who are unfamiliar with it:
"It tightly integrates the KVM hypervisor and Linux Containers (LXC), software-defined storage and networking functionality, on a single platform. With the integrated web-based user interface you can manage VMs and containers, high availability for clusters, or the integrated disaster recovery tools with ease."
This product seems pretty cool. There are also other products that they make like the Proxmox Backup Server and Proxmox Mail Gateway. I'll take a look at these potentially at a later date.
So the steps for getting this working seemed pretty clear:
-
Get Promox VE ISO
-
Create bootable USB
-
Install Promox VE on the Dell Optiplex
Promox VE ISO
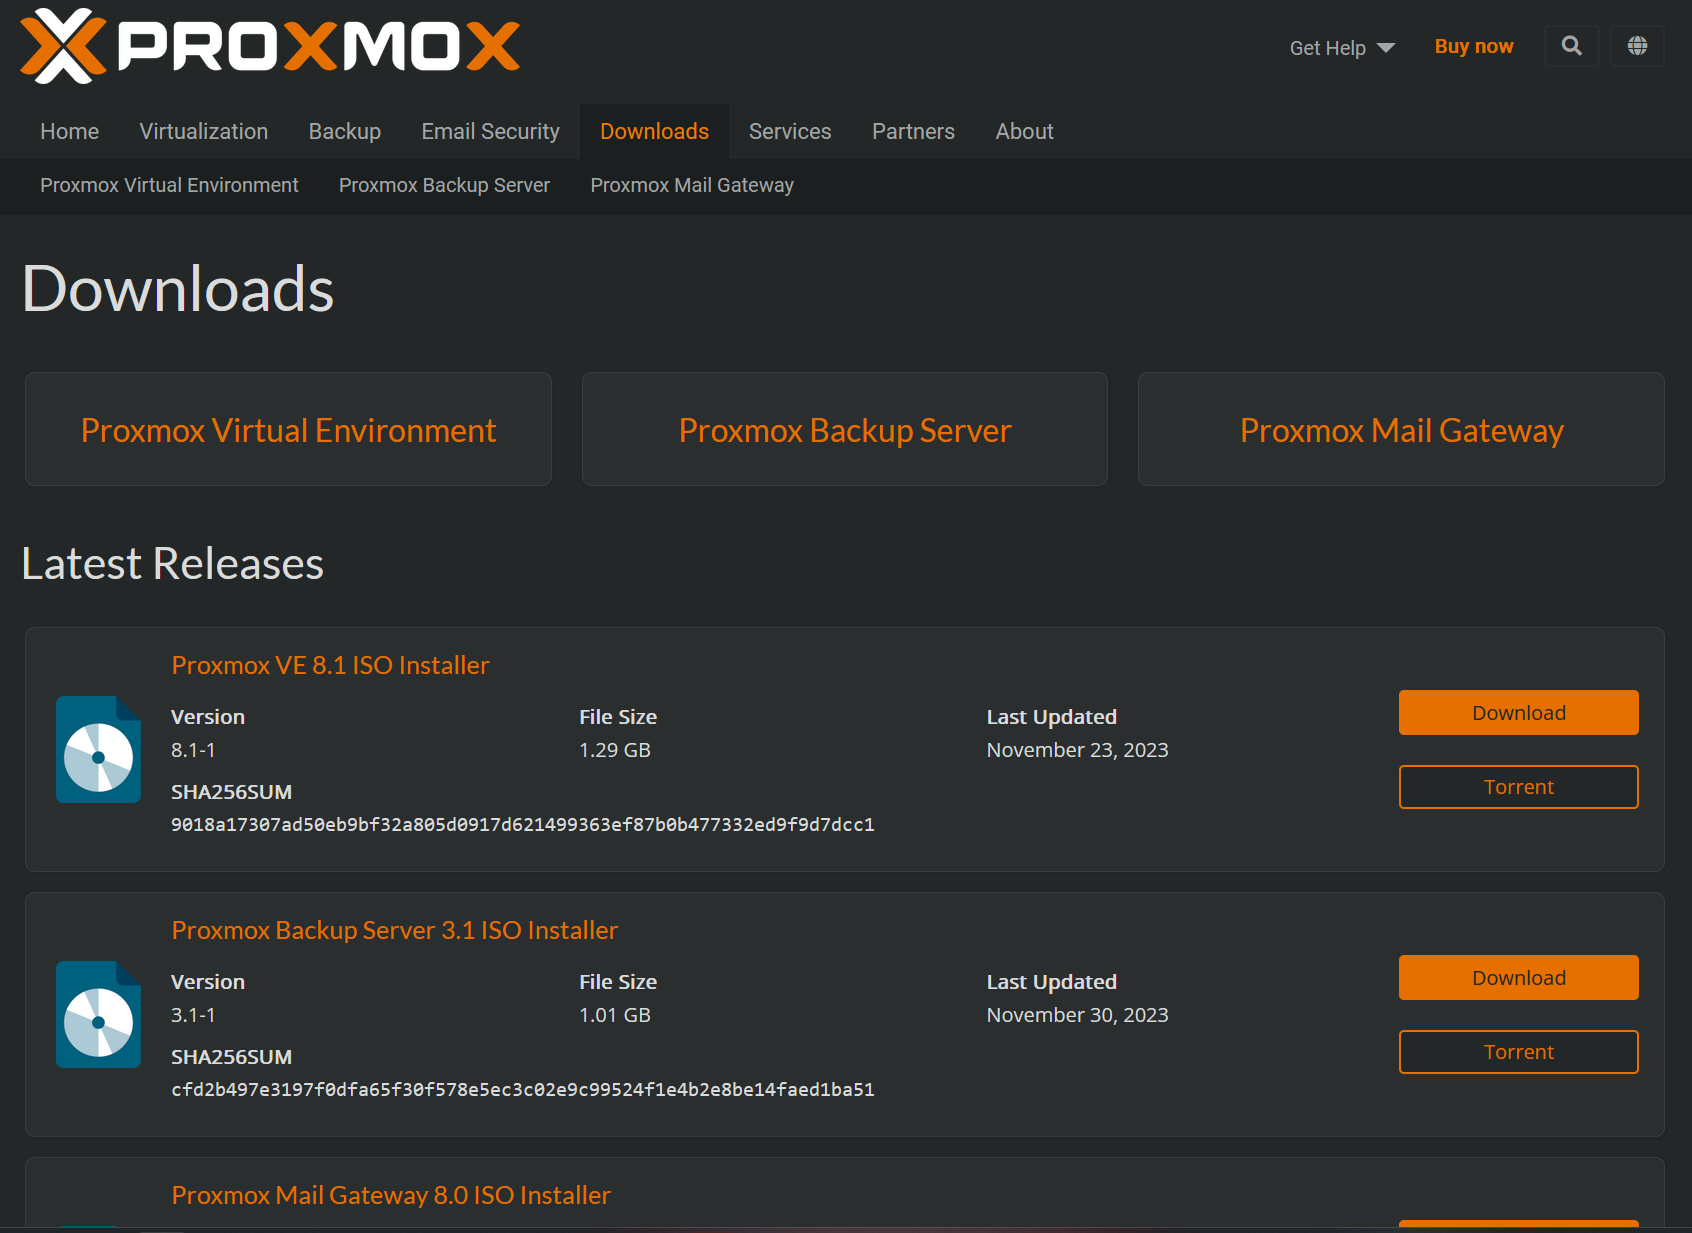
Getting the Proxmox VE ISO is very simple. Just go to the download section of their site, select the release you would like and wait for it to finish downloading onto your machine:
Create a Bootable USB
The software I chose to create the bootable USB was Rufus. I have used this software in the past. Its a great little tool to help create bootable USB sticks using ISO files and you can create boot media for Windows, Linux, whatever your heart desires.
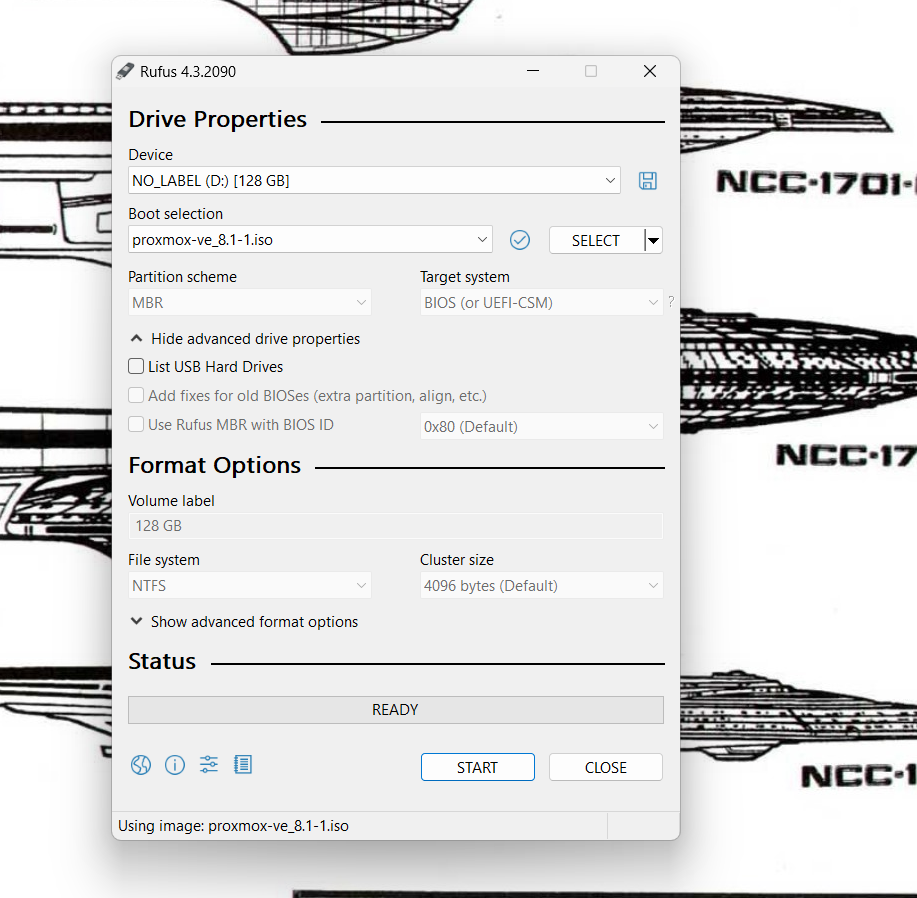
Now, even with my previous experience using Rufus I ran into (what I thought) were issues. When I finished imaging up my USB stick, Windows didn't recognize the drive. I was right confused. I was able to find the drive in Disk Management. The USB stick had 2 partitions, 1 was around 1.2GBs in size and the other was all unallocated space. WTF went through my head. I assumed that the imaging up of the USB stick failed so I tried again 3 times.
After the third time rerunning Rufus it then clicked in my head. The image itself was most likely not in a file format recognized by Windows. This makes sense since Promox is based on Debian Linux. Noobie mistake on my end.
I then tried to get the stick to boot using a spare laptop I have (old HP G3 that the GF used to use) and the drive wasn't recognized there either. After another session of swearing, rerunning Rufus, and a beer later I then looked into the UEFI and discovered that Secure boot was off. Noobie mistake #2.
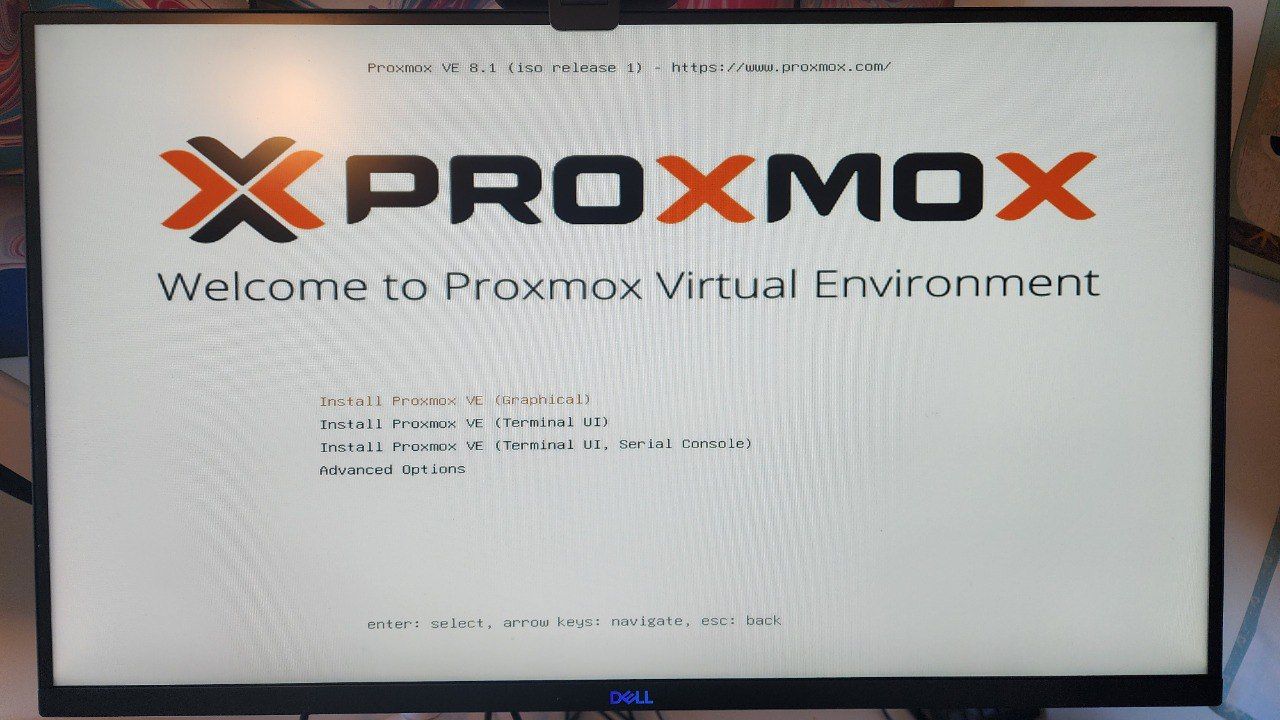
I turned secure boot on, saved the UEFI settings, rebooted the machine and FINALLY the HP was able to recognize my Proxmox USB. Even with the years of experience I have working in IT, I still ran into these silly mistakes. Don't feel bad if this is brand new for you and you run into problems. Just keep on trucking and think through the issue. My A+ cert (from waaay back in the day) came in handy and I was able to work through the problems. Below is a screenshot of the Proxmox Pre-Install Environtment running on the Dell:
Install Proxmox
Installation of Proxmox is pretty easy. It is very similar to any other Linux install that I've done. Just follow the prompts and click next. Some key things to keep in mind when setting up Proxmox is having knowing your network settings. During setup it asks you to input the IP address you wish to use using CIDR notation, your default Gateway (Router) and your DNS Server settings. This is because when Proxmox has finished installing, you won't need to have connect to it physically with an HDMI cable, keyboard/mouse etc. You access Proxmox via a web browser using the IP you setup and a Port number. NOTE This information is given to you when Proxmox has completed its installation. Make sure to take note of it somewhere! When you have completed filling out all information you will be presented with a Summary screen (screenshot below):
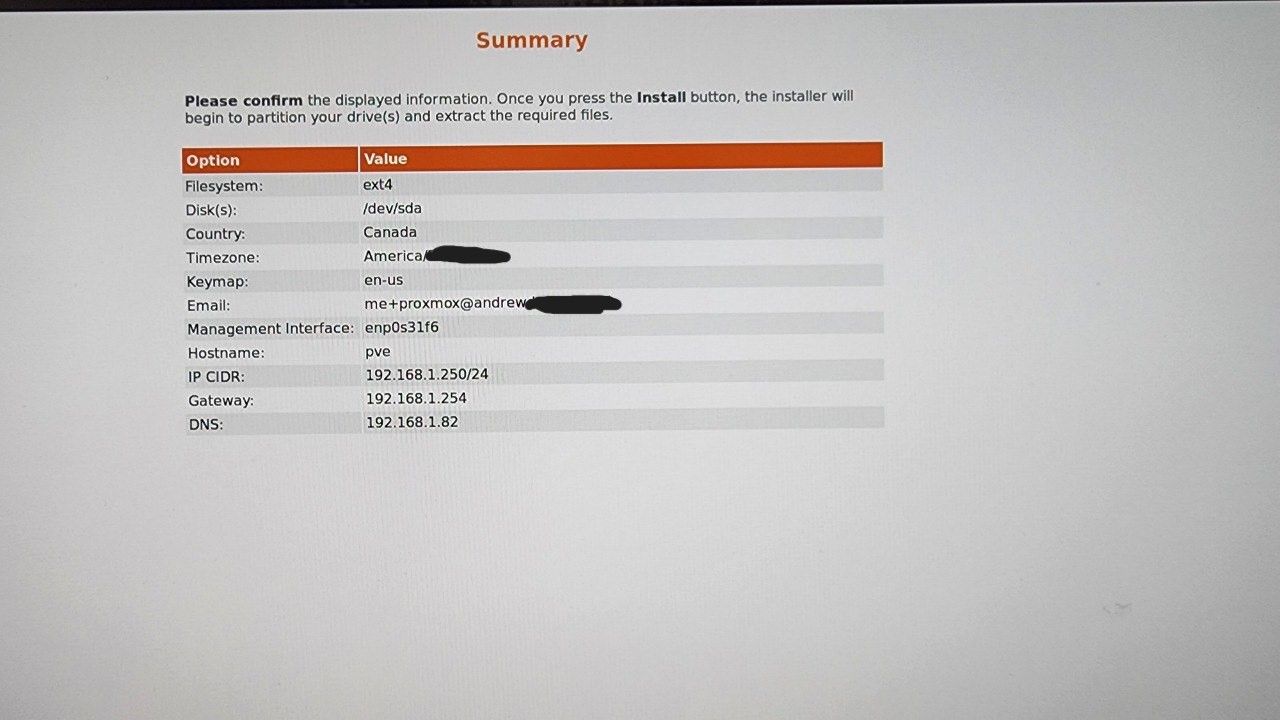
Now just click Next and let the installation begin!
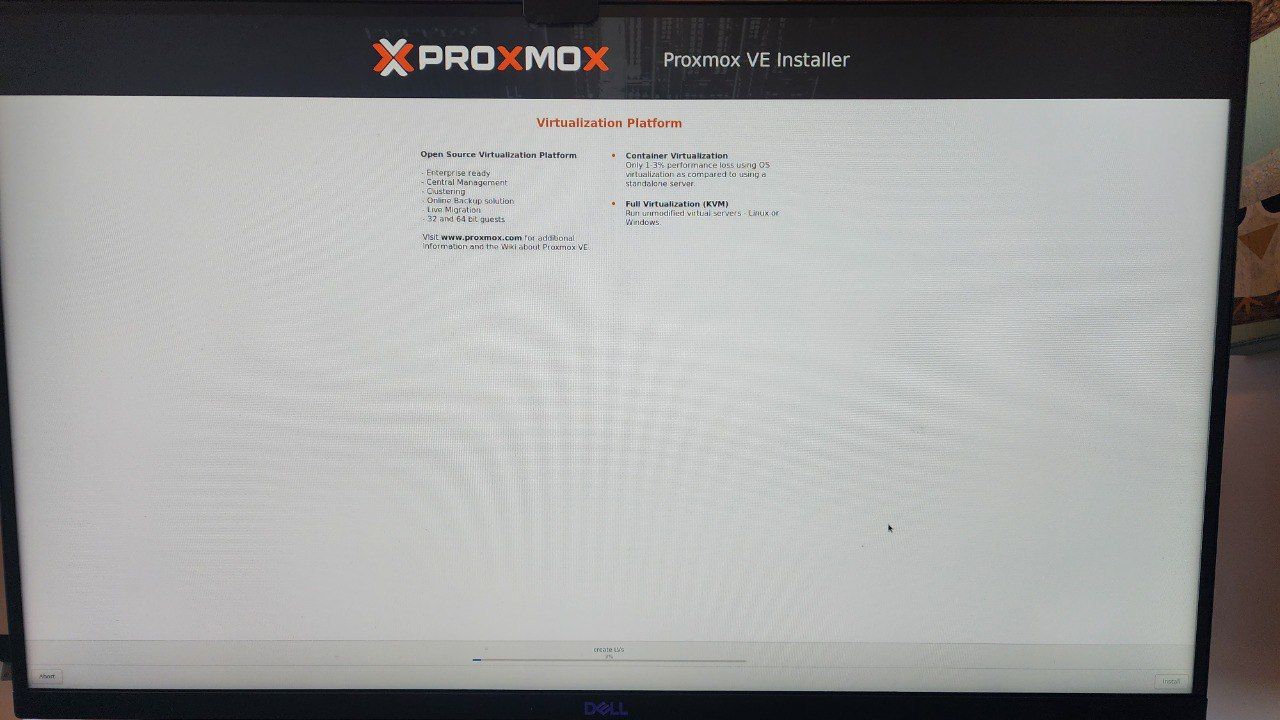
After the installation is complete my Dell Optiplex rebooted itself and I was then able to connect to my new Proxmox Server using the IP and port number that I assigned:
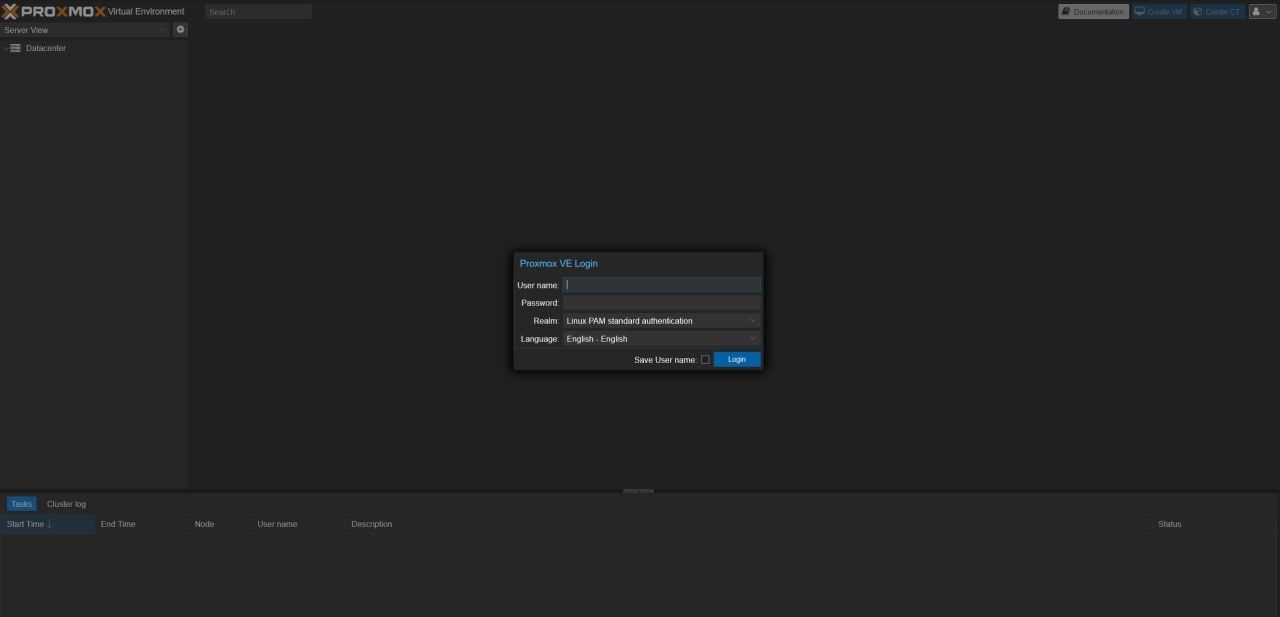
Now that I was logged in I noticed that my 1TB NVME drive wasn't initialized. After some fumbling and Googling I found this quick video explaining how to do exactly this:
Adding Storage Drive to Proxmox Using the Web Interface
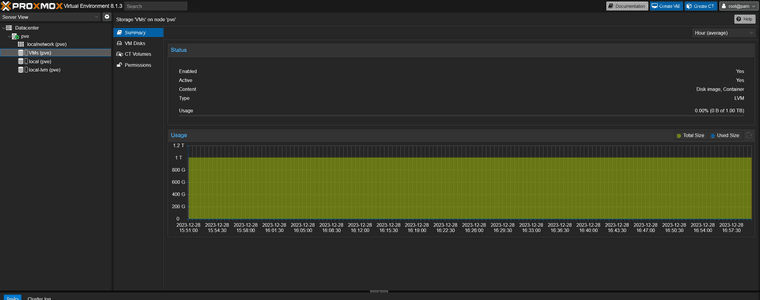
Next, I needed some ISOs on my Proxmox box so I can eventually start to setup VMs. I started moving VMs that I had on my local computer onto a USB stick, but after continuing to watch the video that @Ronald-Robinson recommended I learned that you can download ISOs right within Proxmox! How cool is that?!
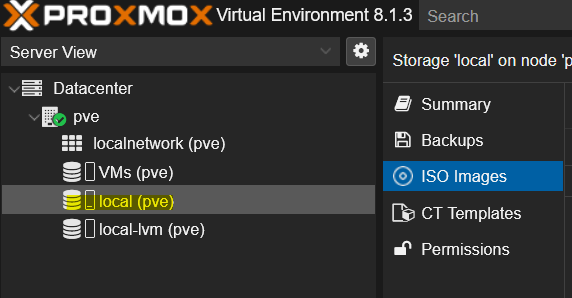
Here is how this works:
-
Select your local Drive and click on ISO Images
-
Click on Download from URL

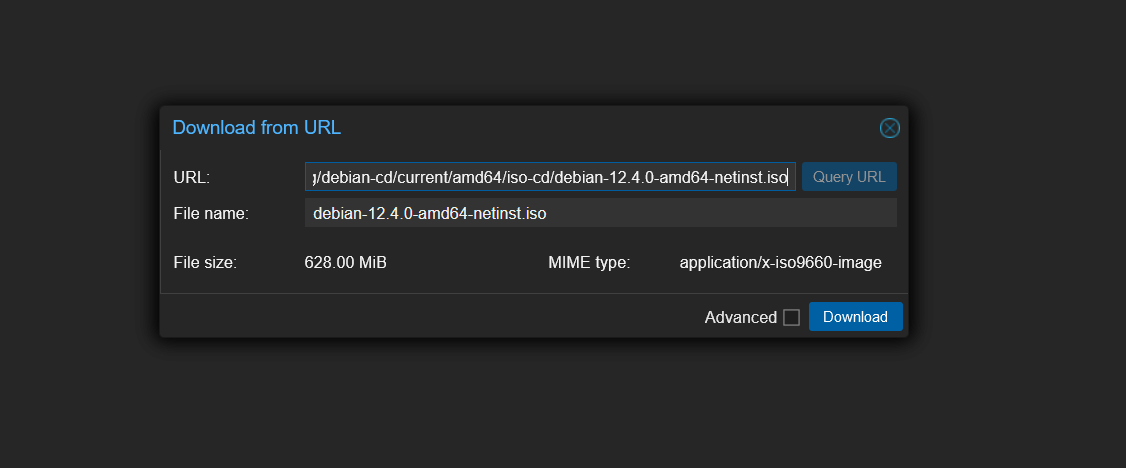
For my first attempt at this I used the Debian image to download as I was following along to that Youtube video.
- Right click on the download link and select Copy Link and paste this link into the URL field of your Proxmox instance and then click on Query URL. This will fill in the File Name field. Now click download. In a few moments you will have the ISO downloaded directly onto your Proxmox Server! So cool!!
Conclusion:
This is where I stopped. I didn't want to do too many steps and make this post even longer. I learned a lot with this episode and shook off some IT noobie rust at the same time. Setting up a Proxmox Server is really that easy. It is super cool that I don't need to keep this desktop on my main desk anymore since I can access it using the IP address I assigned it. It can now safely be put into my server closet (which is an actual closet BTW lol) and connect to it remotely.
Next time I think I'm going to get an actual VM running and hopefully start setting up a Domain controller for my Virtual lab.
If you have any questions, comments or rants for me please feel free to let me know! I would love to know what your experience setting up an environment like this has been like. Do you like the way Proxmox works so far? Or do you prefer another environment like Hyper-V, VMware or Nutanix? Let me know!
Thanks for reading this massively long episode! Looking forward to your comments and updating you with my next step in episode 2!
-
-
@Andrew-Despres I love the "noobie mistakes" you mention :-). I remember installing Linux after I installed Windows and grub completely erased the Windows bootloader (reinstall moment and noobied that...lol). This is great as it gives other members options then just Hyper-V and VirtualBox for a sandboxed environment. Kudos for your patience (swearing and beers aside...lol) and posting your journey!
-
Thanks @wes-bryan!
My goal here beyond learning new platforms and skills is to show that its ok to make mistakes and that they will happen. I've often seen Youtube videos and other walkthroughs where everything just works perfectly. Its rarely going to go perfectly, either at home with my own personal setup or while on the job. I want people to feel that they're allowed to make mistakes and allow them the space for learning. That's what I have to do with myself. If I walk into a project with a perfectionists attitude, I often find myself freezing as soon as something goes wrong and then I give up.
Make mistakes! It's the BEST way to learn!
-
Oh you are so right @Andrew-Despres, you ask Ronnie or Dan I can break a network, hardware component, configuration......anvil...lol. Mistakes are how we learn and grow!
-
 A Andrew Despres referenced this topic on
-
Hey everyone,
Sorry for the long wait for my next episode. Work after the holidays has taken more time than I anticipated. I am hoping to have something for you soon!
-
@Andrew-Despres , you read my mind! I was thinking...."I haven't seen Andrew post anything. Happy New Year and look forward to seeing more of the journey.
-
I'm also in the process of setting up a home lab. I held onto our HP desktop after we replaced it, and am using it two-fold: 1) For virtual machines (have a USB with various images: Various flavors of Linux - Alma, CentOS, Fedora, Gentoo, Ubuntu Desktop/Server, Arch, Kali and Mint; Windows 10 and 11 and Server 2019), and 2) to configure the $50 switch I got off Amazon. It's a Cisco Catalyst 2960 48-Port 10/100 PoE switch. I'm working on acquiring a used Cisco router, firewall and a couple of APs so I can get practice configuring those. I also have Packet Tracer downloaded, so there's that as well. I do have several laptops (an HP running Windows 11 Pro, my HP desktop running Windows 11 Home, my replacement desktop running Windows 11 Pro, an HP laptop running Ubuntu 22.04, and a MacBook Pro running Monterey (too old to upgrade). Also have an HP Chromebook.
-
@David-Thompson that is going to be so much fun! Cannot wait to see you post some of your progress.
-
Hey everyone!
(Heads up, I didn't proof-read this because its massive. Please forgive me for any spelling or bad grammar.)
Massive apologies to you all for not getting another update completed recently. Between getting started at work again and some health issues at home, my desktop decided to crap out on me too.
Soooo, with that....BONUS EPISODE!
The Saga of the crashing GPU or Why I Hate Riser Cards
This story begins a long long time ago in a galaxy far far away. Well, not far away, at my house...
Back in the fall of 2022, I got a new job and I decided to help celebrate this by purchasing a new (to me) shiny GPU, an Nvidia 3070 Founders Edition. It would be replacing an EVGA 1070 Super which was becoming quite dated, though ran very well. When buying this used GPU it had only roughly 6 months of use and claimed to be used only for gaming. The original owner also gave me their receipt from Best Buy so it felt super legit.
The moment I put that GPU into my rig I was running into issues. My rig at the time was a NZXT H1 v1 which had a 650w PSU, AIO (all-in-one) CPU cooler, a Ryzen 7 5900x CPU, 2 NVME SSDs and 1 2.5" SSD all in a small form factor case. It is roughly about 30%-40% bigger than an Xbox Series X. I had always wanted to build an ITX small form factor PC and this case looked so very cool to me. With smaller cases like this though, there are some things that need to change in order to fit in larger GPUs. The work around that has been implemented with PC builders is called a PCI-E Riser Card. If you're unfamiliar with this part, just think of it as an extension cable for the PCI-E slot on your motherboard. you will then be able to mount your GPU in a different part of your case, thus allowing to keep the depth of the case a lot slimmer than a standard PC case.
From the day I installed the 3070 into my NZXT H1 I ran into problems. I would consistently run into Windows Video Driver errors, games would crash, even just watching a YouTube video would cause the driver to restart or the whole PC to crash. Constantly the nvlddmkm error would pop up in my Event Viewer in Windows. Googling around pointed the finger at bad or corrupt drivers and if a properly installed driver didn't fix the issue, then the card was most likely bad.
This is when I learned about the software program DDU(Display Driver Uninstaller). I learned about this software from Jays2cents. He has a whole video describing how installing drivers over top of drivers can cause major corruption and make GPUs unstable. Who knew there was a proper way to installer a video card driver??
Essentially there are 2 major issues that come with video card drivers:
- The .EXE installation files from nVidia did a terrible job of removing all aspects of any previous drivers, even if you select the option to do a clean install.
- Microsoft Update constantly overrights newer versions of your GPUs drivers with what it has in its cache.
In order to solve this problem, dealing with the Microsoft auto install of Drivers needs to be addressed. This can be done in multiple ways such as using Powershell commands, GPOs or through the GUI itself. I used a walkthrough similar to this one from Woshub. General Warning Take these steps at your own discretion! Do your own reading before you make any changes to your system. Don't just trust my word for it ;)
Once auto driver updates has been disabled I was then able to move on to my new nVidia driver. I downloaded the latest driver from nVidia's website, and then rebooted my desktop into Safe Mode with no networking. Once I'm in Safe mode, I can then run DDU. This will fully remove all nVidia driver software and Reg keys. Once completed, I then rebooted my machine and looked at the horrible ugliness of the default VGA driver that Windows uses. Install your latest driver, perform one last reboot and then that was the end of that!
Or so I thought...
About a day or two later I ran into the exact same nvlddmkm driver error playing one of my games. Curses ran out of my mouth which probably aren't appropriate for me to repeat here. The only thing that could be the culprit is a bad GPU. Working with nVidia support I was able to arrange for an RMA of my 3070. Sadness poured down my face sending that thing away. Luckily I never got rid of my old 1070 so that kept me playing (and working) for the next several weeks until my new (though refurbished) 3070 would return.
Fast forward to that day where my GPU arrives back at my apartment. I followed the same steps to install it into my system. Ripped out the old 1070, rebooted into safe mode, ran DDU, installed latest driver from nVidia...profit? For a few weeks, yes, this was the case. Unfortunately, the terribly nvlddmkm error returned!
I was dumbfounded. How could this still be happening? This is a brand new (refurbished) GPU. How could this error still be coming back? I ran some software that the nVidia support rep sent to me for stress testing the card. Unfortunately I do not know the name of it anymore. This software puts your GPU through the freaking ringer. Maxes out all aspects of the card and send its temps into the 80-90C range. I ran the test for 30 minutes. Nothing, the card passed with flying colours. Not a single error during that time period. But, when I start a more graphic intense game (at this time I was trying to play Battlefield 1 and 5) and the game crashes almost on cue every time around 15 minutes it.
At this point I figured, "Maybe this is a Windows thing. Maybe Windows 11 is just terrible (it is, but for many other reasons) and I should embrace my true nerdiness and become a Linux User. After a few days of reading and research, I decided to install my first, full time, Linux OS, EndeavorOS, a branch of the Arch Linux distro. I am now one of those users that can hold his head higher and say that I use Arch Linux now :p
After figuring out how to select the right distro for Nvidia drivers, learning how Proton works, and working out a couple kinks with Linux, I have to say gaming is Linux is AMAZING! I was able to run games in Linux that always gave me issues in Windows. Battlefield 1 and 5, the games that would crash within minutes? I was able to do hour+ long runs in these games. Single player or multiplayer. I had did it! It was Windows all along!! Bye bye Windows! Bye bye Microsoft! Bye bye......record scratch....Why do I have these weird squiggles on my screen? Why did my machine stop working? The issue was still there, graphic driver crashing, just in a different way.
I continued to do some troubleshooting with NZXT. I then decided to try eliminating the 1 extra piece that a normal computer build wouldn't ever use. The PCI-E Riser Card. I started to take my desktop apart enough so I could wiggle the motherboard to the side and plug the GPU directly into the PCI-E slot on it. I decided to boot back into Windows since it was on a different hard drive (dual booting OS' FTW), and run Battlefield 5. The dreaded game that would cause all the crashing. I opened the game, it loaded successfully. I selected Single Player and selected a campaign. It loaded without issue. I played the game for over an hour, stable. I left it on overnight to see if I would wake up to a login page. It was still on the pause screen. It....worked?? It was the Riser Card all this time! I did it! I contacted NZXT support and had them RMA the riser card.
After a few weeks the card had arrived. I started the process of swapping the riser card and putting my machine back together. After about 20 minutes, I was ready to test. I booted back into Windows, ready to test a problematic program. Within 30 seconds of booting into Windows, I see a flash on my screen. I checked the Event Viewer logs, the dreaded nvlddmkm error had returned. I was experiencing these driver reloads every few minutes. How could a new part make my desktop MORE unstable? I thought maybe I didn't reseat the GPU or Riser Card properly. After reseating, back to testing. Same issue. I booted back to EndeavorOS, within minutes of watching a YouTube video my screen would go black and then fail to recover. I was back to square one.
After a couple days of trying reseats of the hardware, fresh driver installs and crying into my energy drinks, I said forget it. This is dumb. There has to be some kind of limitation with using Riser Cards and a heavy duty GPU like the 3070. So I went down to my local Memory Express Store (think of Microcenter, but for canucks), and purchased a new case, PSU and CPU cooler.
I decided to go with the Fractal Design Pop Mini Air for my case. This case is quite a bit larger than the H1, but it has a ton of airflow and allows for further expansion with the fact I can fit mATX motherboards as well as ITX motherboards.
For my PSU I wanted to go with a brand I can trust and have used before so I picked the EVGA Supernova 750. This PSU is slightly more powerful than the NZXT PSU that comes with the H1. It is also fully modular so that helps with cable management.
And lastly, for my CPU cooler, I selected the Lian Li Galahad II Trinity 240mm. I've known about Lian Li for a long time, though this is my first ever purchase of one of their products. I was torn if I should go with another AIO cooler or just get an Air Cooler for my CPU. The sales associate that helped me pushed me in this direction simply because of the CPU I am using, the AMD Ryzen 5900x. They also have the same cooler in their custom PC at home, so that was good enough for me.
It took my most of yesterday evening to put this all together so I haven't tested with it much yet. However, I can report that I did a quick session of Battlefield 5 this morning before I started work and everything ran smoothly. I also switched back to my EndeavorOS install as I have come to really like this Operating System and I think I may be a Linux user for life now.
If you've made it this far, thank you for taking your time to read this epically long story of how I have come to hate Riser Cards. I hope to have some more content relating to my Proxmox Home Lab soon here. I need to take some time to figure out how to connect Proxmox to my NAS so I can grab my ISO files from it. Time to pull out some Google-fu for that step!
If you have any questions on what I have done or have had similar stories of hardware nightmares feel free to post them! I would love to hear your experience, or, if you're having hardware problems now maybe we (myself and the collective brain power of the ITPro Community) can help solve it.
Until next time nerd-os!
-
Dude. You need to create a substack or /reddit and share this with the world as well as the elite ITPro family. ;-)
You have me hooked to continue to read the adventures of Andrew the BYO-PC guy. -
That was a lot of work, frustration and patience. Great job @Andrew-Despres and thank you for sharing.
-
When can we expect "War & Peace, Vol. 2?" LOL Nice job, @Andrew-Despres!
-
@Chris-Ward-1 Haha! Thanks Chris! I was thinking of putting it up on some sort of social media. It might be even better to host it on a website or some blogging service. Do you have any suggestions?
I have my own Google Workspace domain configured, maybe I should just make a Google Site and set it to public.
Thanks @wes-bryan and @David-Thompson! I'll try not to write any more epics, but who knows lol. I'm hoping to get something out next week with the proxmox server.
-
By all means, keep the content coming... It was a really interesting read.
-
It's that time again! A new episode of my Proxmox HomeLab!
Episode 2: ISOs, VM Settings and Installation
So where I left things off last time I was so excited by the idea of being to just plop in a URL of an ISO download that I never figured out how to get other ISOs from a USB stick or NAS onto my Proxmox server. I was fumbling around, trying to find, read and understand the documentation that I was very confused. The entire time I was struggling away I ignored a VERY obvious UI button that would've made this whole thing a lot simpler. I'll just post a screen shot of said button:
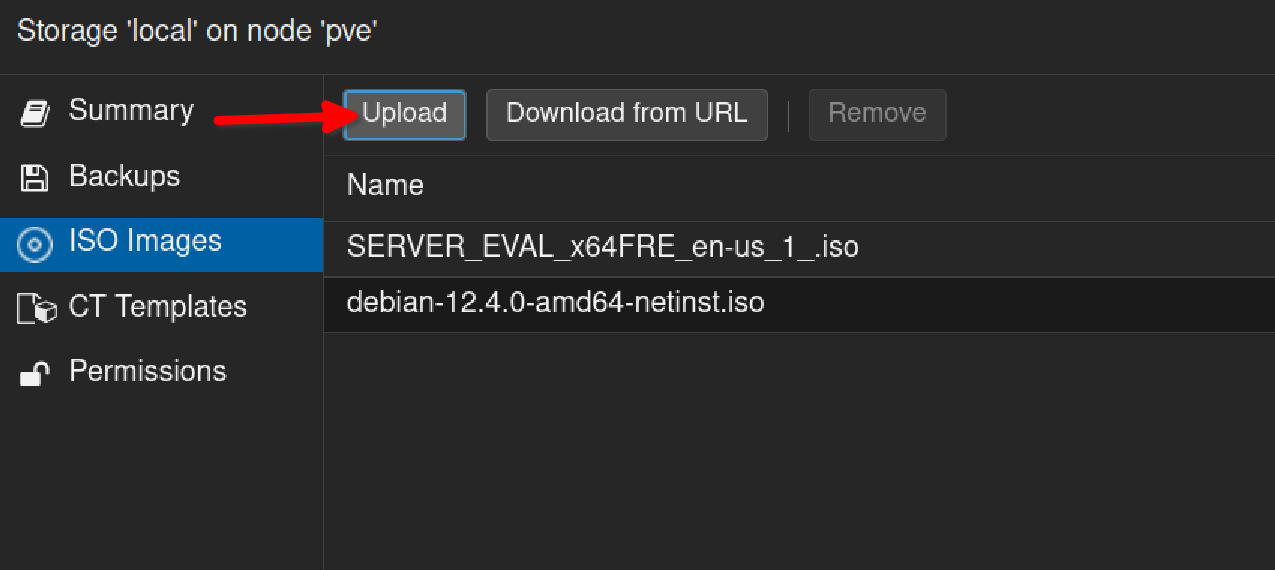
Get your ISOs with this one quick trick! The secret of getting ISOs THEY DON'T WANT YOU TO KNOW! Clicking the upload button and selecting your ISO from your local machines HDD. Reading is a challenge for me apparently haha. Classic IT person trying to think of clever or more complicated ways of performing a task instead of just reading the UI.
After you click upload, select your ISO file and then click upload:
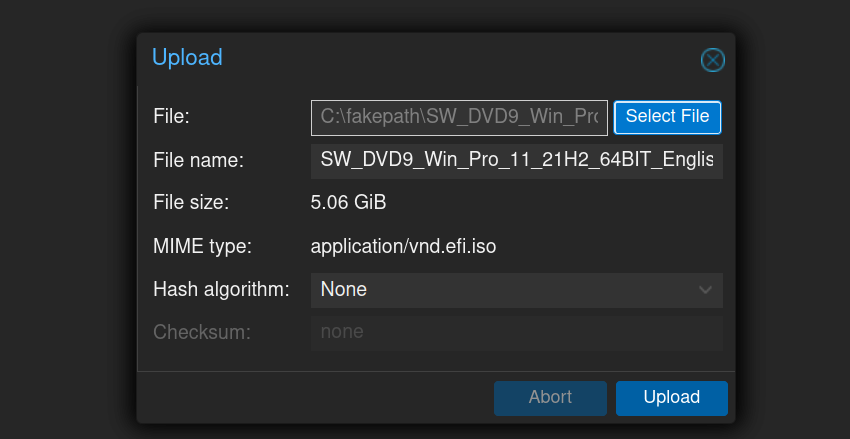
After a few minutes (depending on your network connection) your new ISO file is now located on your Proxmox server, ready to be used to make a VM.
Before I go ahead and start creating the VM I wanted to show the System Summary screen. This can be very helpful in the future to see the health of the VM. You can see CPU usage, RAM usage, Storage capacities etc etc etc. Super helpful screen!
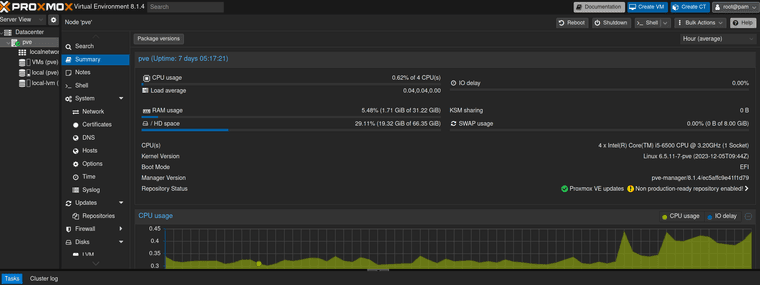
Once I'm done looking at the shiny blue bars and green graph I go ahead and click the "Create VM" button in the top right side of the screen. Clicking this button brings you to the first configuration page of your soon to be VM:
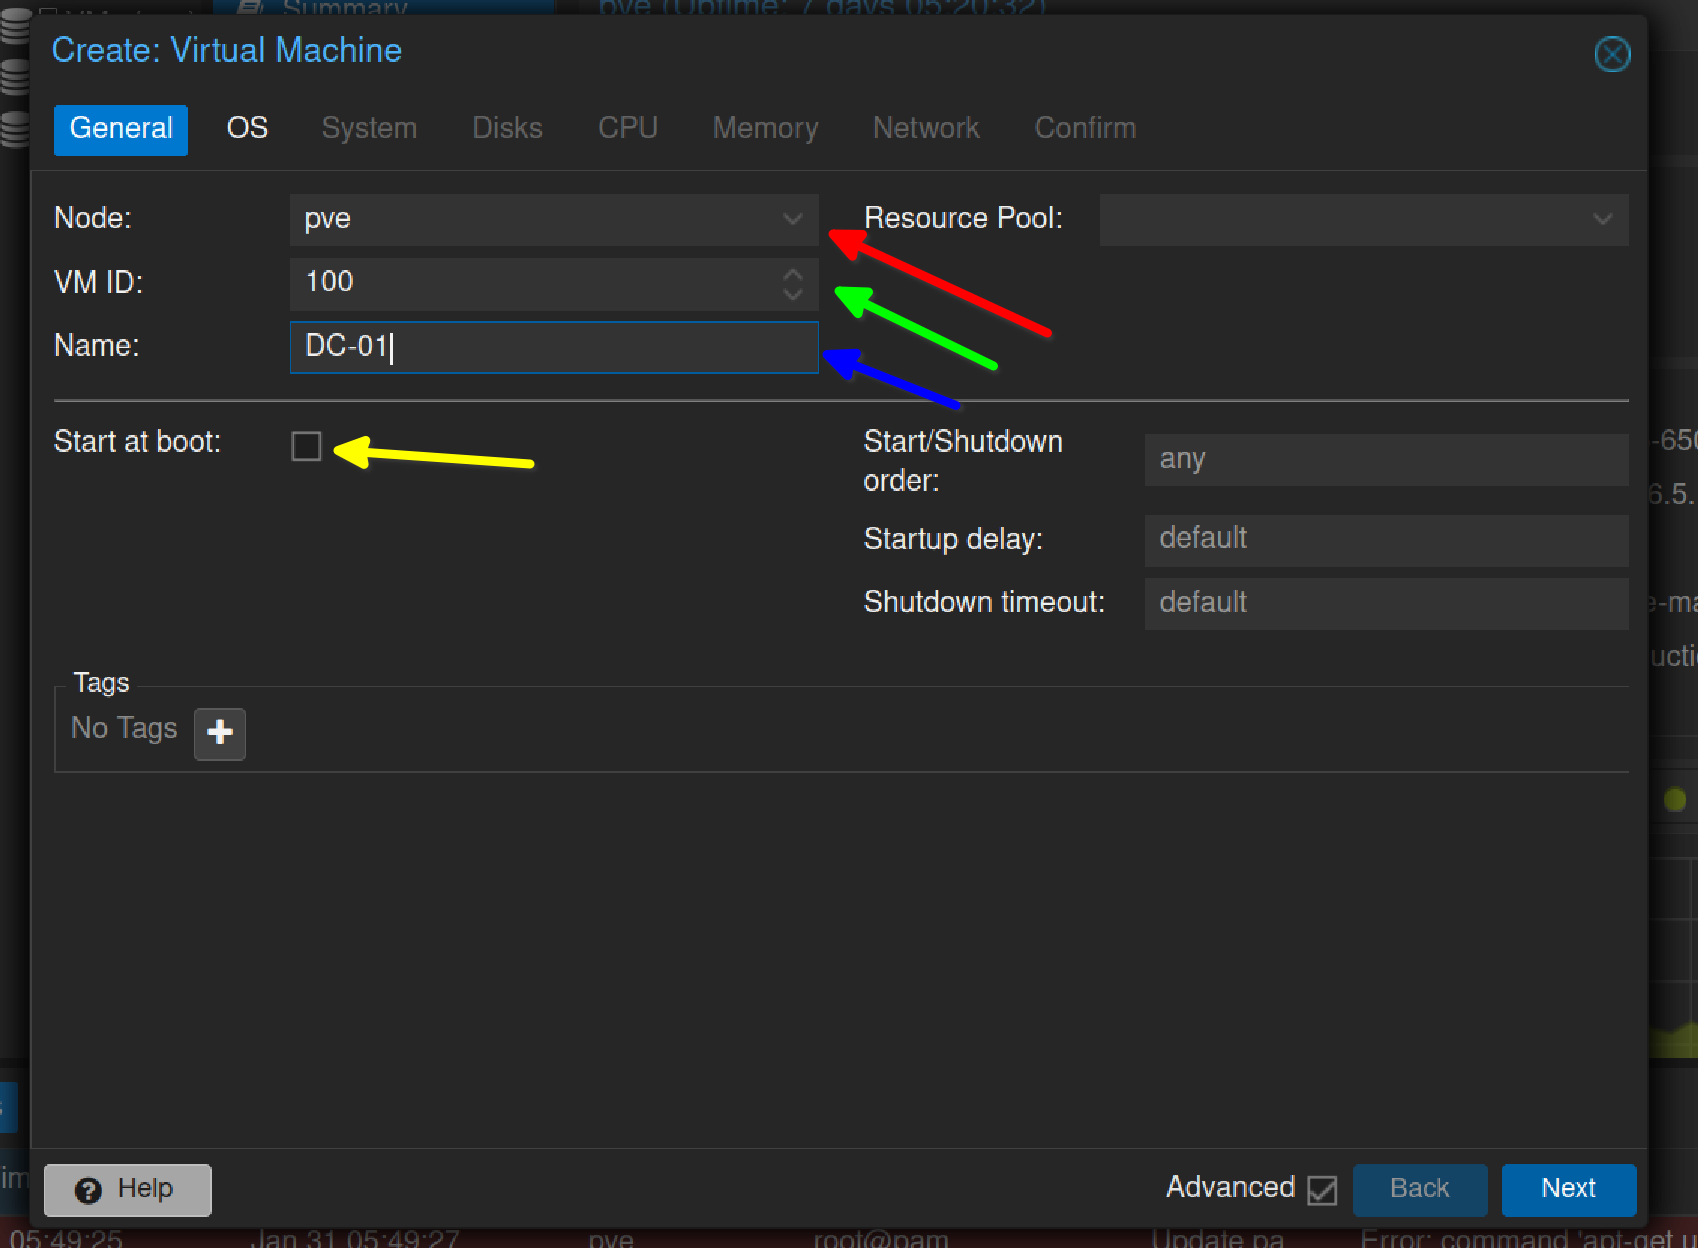
Some important things to point out here that I have colored arrows pointing to:
The red arrow is pointing to your Node, or your "Proxmox instance" as I'll call it (if you have a better descriptor for it please let me know!). Essentially if you have multiple Nodes you can create new VMs in these different instances. It might not seem relevant now, and it kind of isn't, but, this can be VERY useful for redundancy. For example, lets say you need to run maintenance on Node 1, you could then migrate you VMs over to Node 2 and Node 3 and keep them online. This would be mission critical for you so your clients don't lose access to that super important File Server or Print Server. Ugh, printers....shudder.
Something to keep in mind too while we're discussing this topic of migrating machines is that you can migrate VMs, but not Containers. If you need to move a container over Proxmox will run scripts on the container to safely shut it down, migrate it and then boot it back up.
Green VM ID: This is just a number that Proxmox wants to assign your VM. If you're super hardcore, you will have a number schema already selected ahead of time. 100-199 could be VMs, 200-299 can be containers etc. If you do nothing with this number, Proxmox will just increase its number by 1 each time you create a new VM.
Blue Name: Make sure to give your soon to be VM a clever, or in my case, an incredibly utilitarian name. Since my first VM will be running Windows Server 2022 I have called it DC-01. Putting my security hat on, you may not want to use a naming system like this in case you are ever compromised. With a name like DC-01 it gives any potential bad actor a pretty clear target to start to brute force. Just like the VM IDs, you will want to plan this ahead of time. Maybe use something from pop culture, Star Trek=Starbase-01, Star Wars=Millennium-Falcon, Lord of the Rings=Mordor etc, or something simple likes colours, car brands, whatever you like. JUST MAKE SURE TO DOCUMENT IT SOMEWHERE!
Lastly is the yellow arrow, Start at Boot. Check this box if you want this VM to autostart when Proxmox reboots. Super helpful if this is critical infrastructure and you need that Domain Controller back up ASAP. You can even give Proxmox instructions on which VMs to boot up first in case you have any servers that are dependent on others. With all of that done lets move on to the next section, OS Selection.
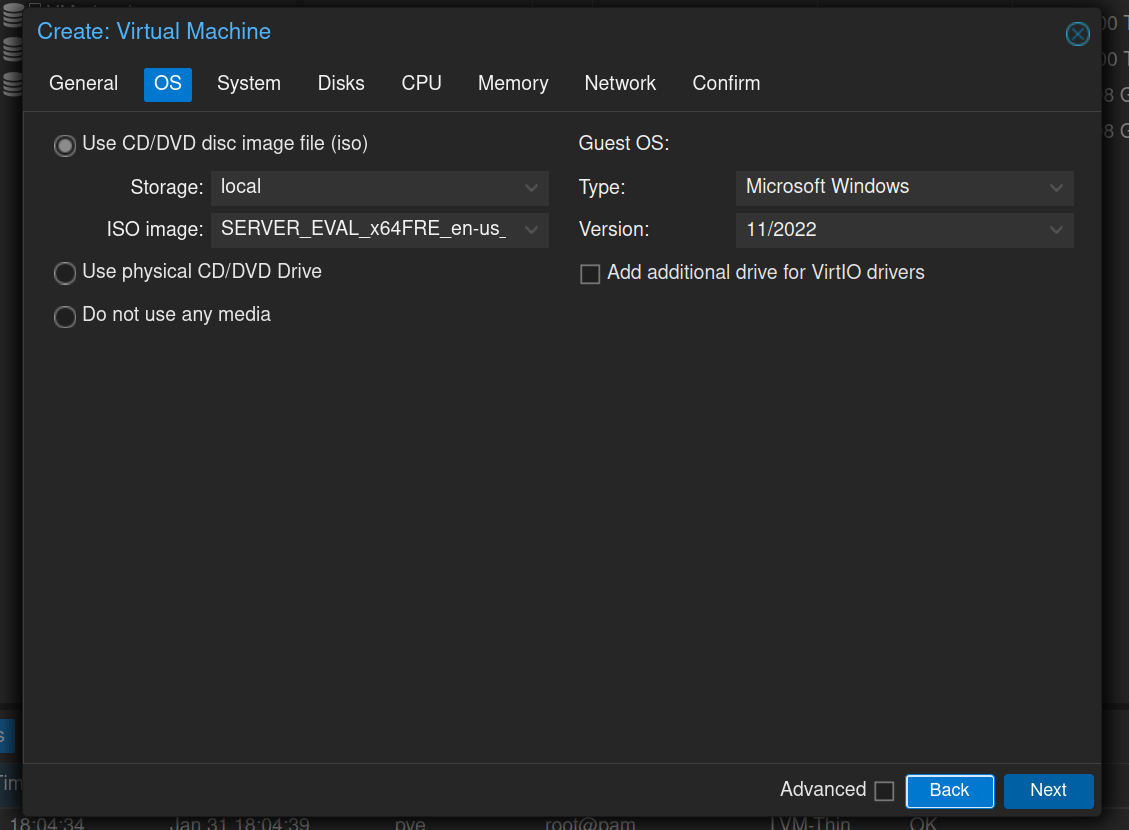
For your first boot up you will want to select the option of Use CD/DVD disc image file. Please do not get confused like me where it says Storage. I was of the mindset that this is where my VM will be installed and it always defaulted to my PVE drive which is the local Proxmox HDD. This Storage section is asking you where to look for ISO files. Change your GuestOS settings, in my case I selected Windows and selected the Win11/Server2022 version. Now onto System.
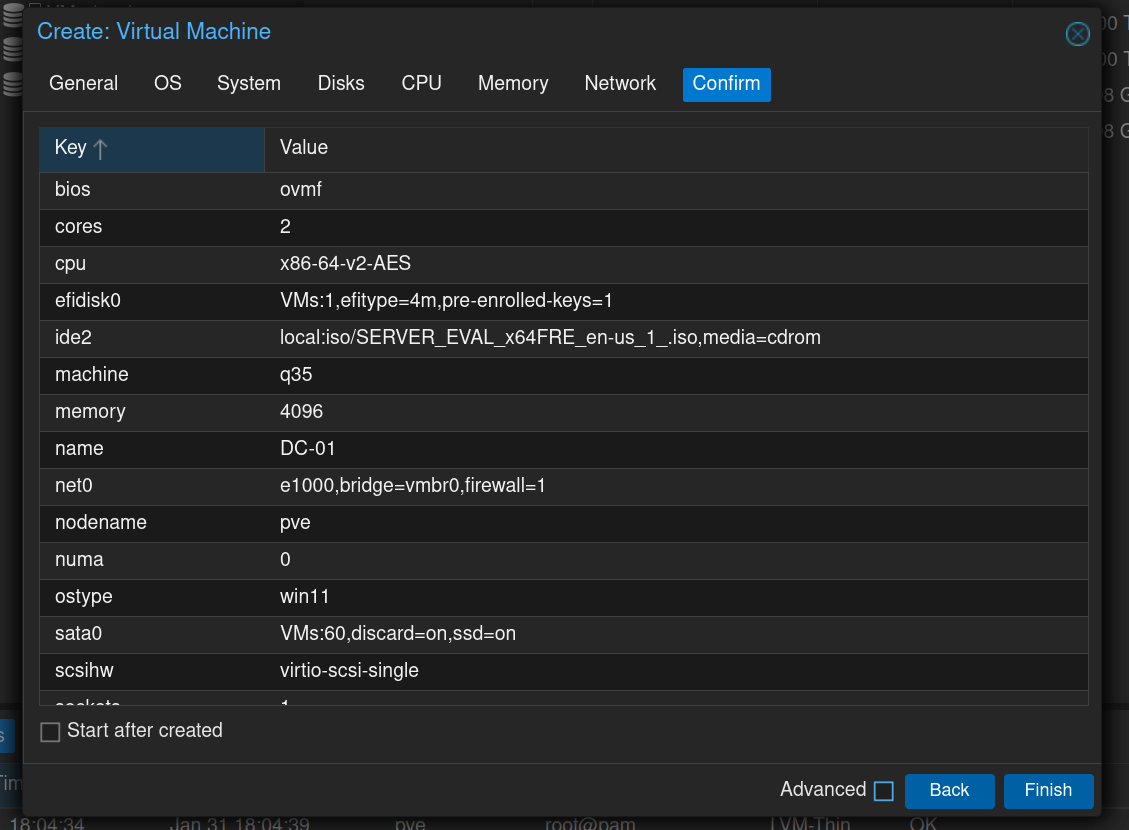
The system section is essentially your BIOS/UEFI settings. Here you can select what kind of SCSI controllers you want to use, where to store your TPM keys and where you want your VHDD to live. I selected the VMs disk as this is that nice shiny 1TB NVME drive I purchased way back in episode 0. For the most part as I'm aware, these settings can largely remain as default.
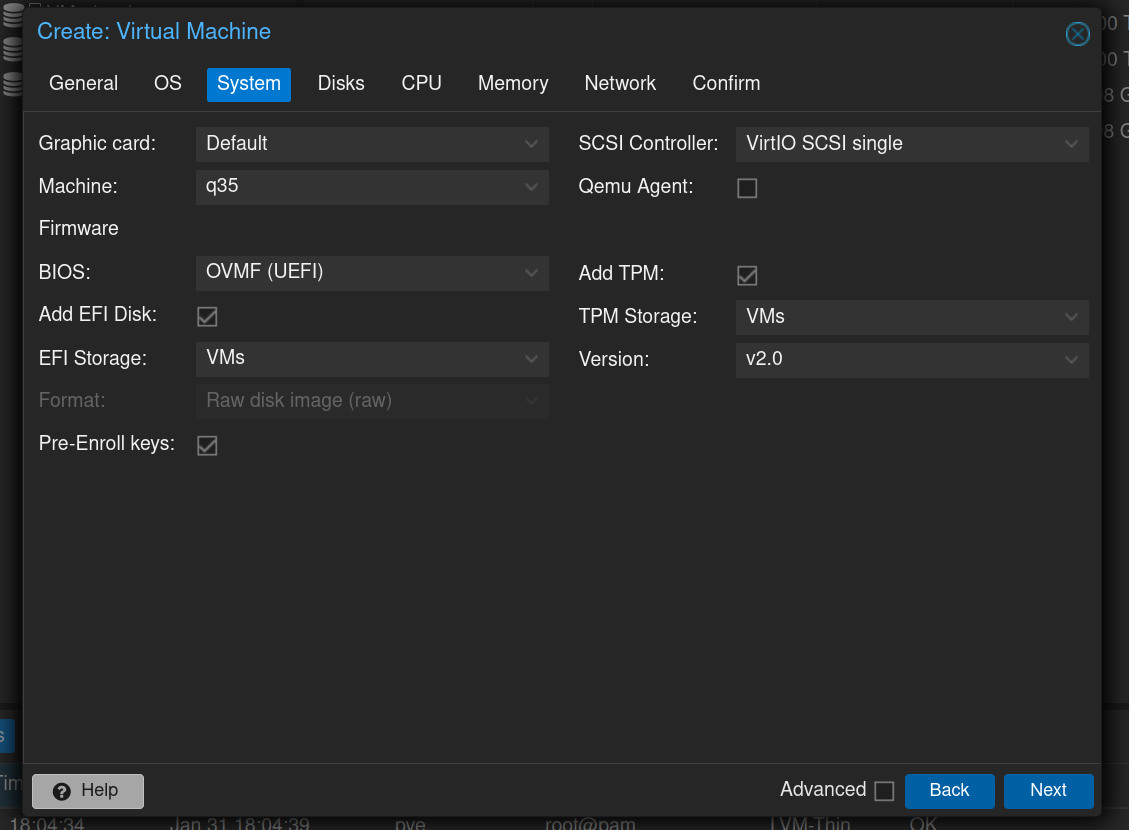
NOTE When I started writing this episode I learned that there are important optimization settings that I should do for Windows VMs in Proxmox. I haven't gone through all of these settings yet, but I have found some awesome documentation about these optimizations like what VirtIO drivers are, QEMU Agents as well as an awesome video by Learn Linux TV about setting up a Windows VM in Proxmox. I'm also following his Proxmox VE Full Course to learn more about the in's and out's of Proxmox. Give him a follow if you're interested in Proxmox or learning more about Linux! With all of that said, I will be making an episode 2.1 going through these important optimizations and correcting any mistakes I may have made here. I didn't want to keep this episode waiting for much longer as its been WAY too long since Episode 1 came out.
Next is Disk options. This is where you will set options for the virtual HDD that your system will use. You will need to pay very special attention to some of the settings in this section. By default, Proxmox will attach the Virtual HDD to your system as an HDD (mechanical drive) even if you're actually using an SSD. So, if you're using a SSD, make sure to turn on advanced options and select SSD emulation as well as the Discard checkbox. SSD emulation will let the GuestOS see the drive as an actual SSD and Discard turns on the "TRIM" feature for the SSD. TRIM is super important for the overall health and lifespan of your SSD so please make sure its on. The fine folks at Kingston Technology put it really well on their website:
"TRIM is a command for the ATA (Advanced Technology Attachment) interface. When the operating system needs to tell the SSD it’s deleting files and that those file pages need to be made available for new information, TRIM provides that functionality. In combination with Garbage Collection, TRIM works to clean up and organize your SSD, making it more efficient and prolonging its lifespan."
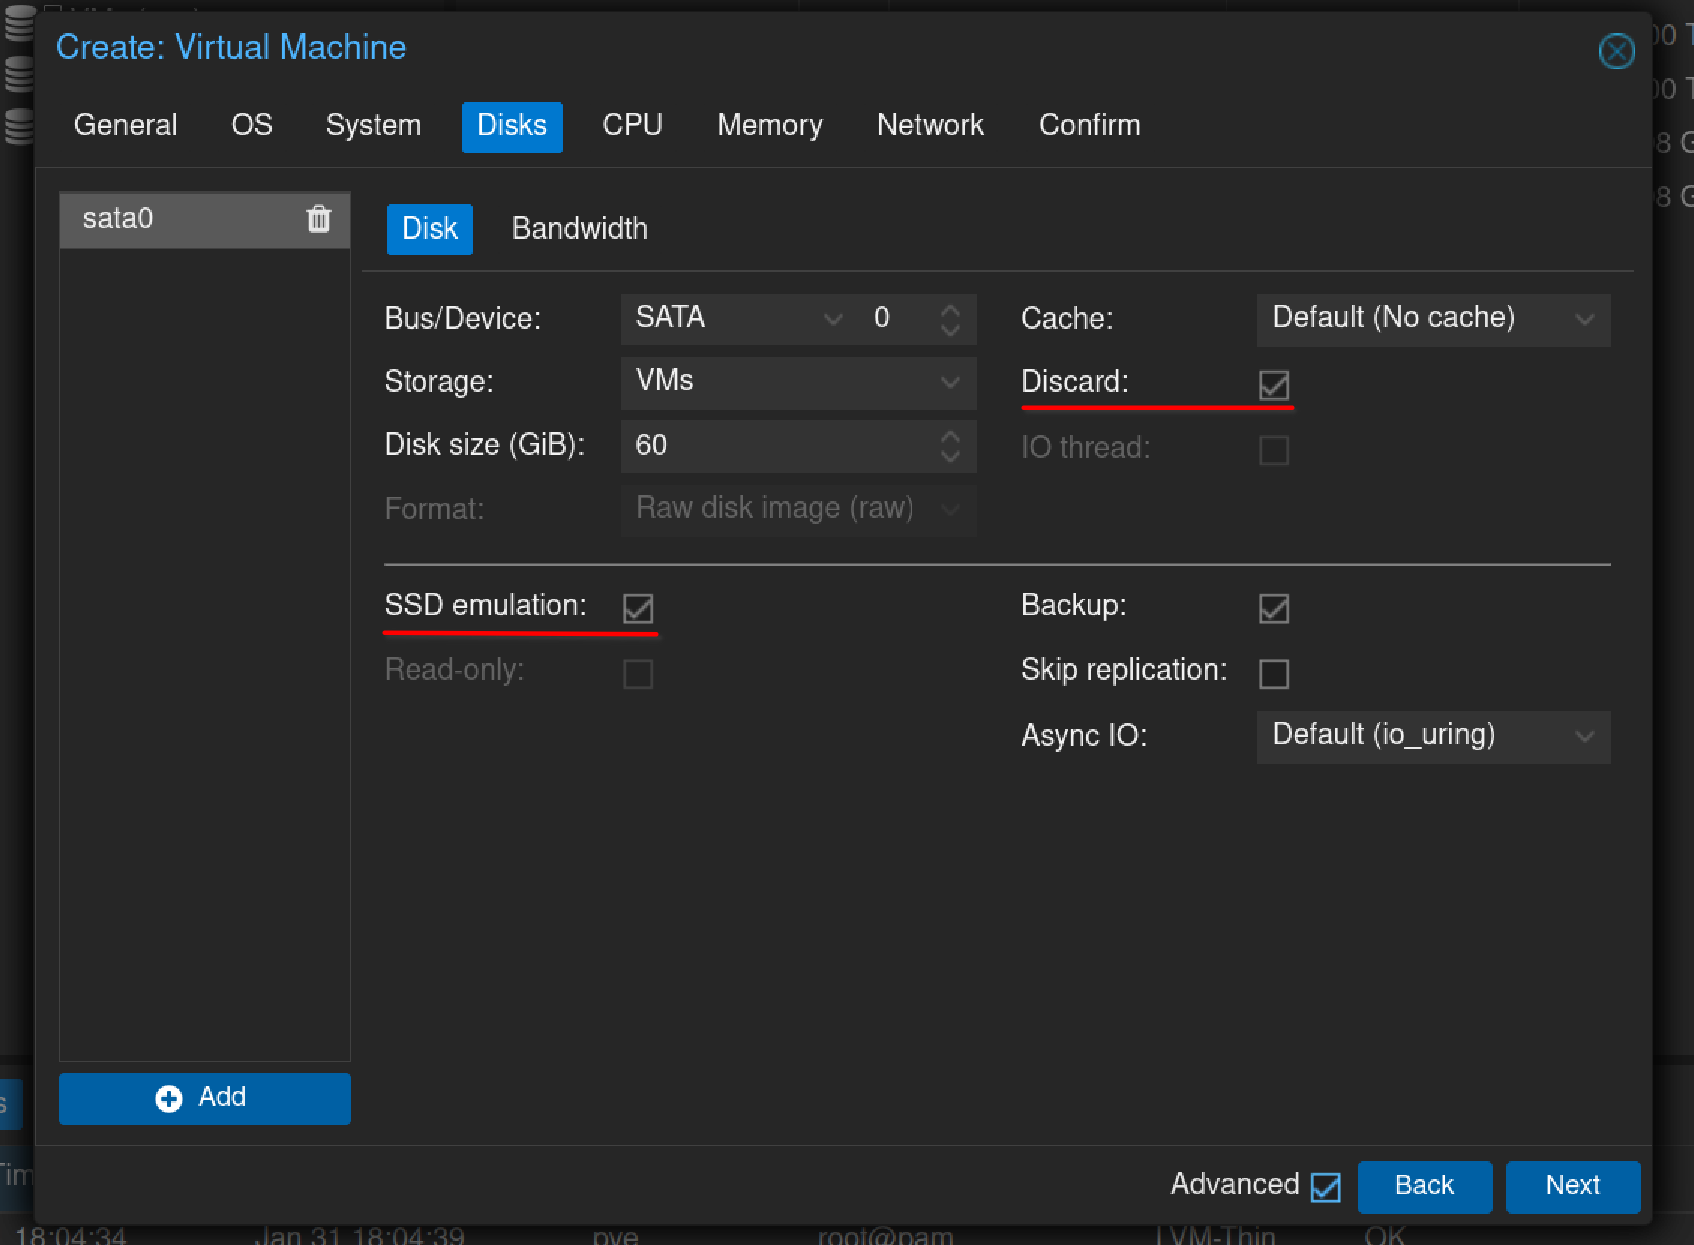
After some consultation with an old work colleague and scouring the internet for various opinions, I decided with 60GB for my virtual HDD size. This seems reasonable as I don't think the services that I plan on putting on this Domain Controller should take up that much space. Maybe I'll be proven wrong. I guess we'll find out in the not so far future! Maybe there's a way I could expand (or contract) the storage on the VM as well. I know this is possible in Hyper-V, I'm sure there's something for Proxmox.
Next is CPU settings. I bumped up my CPU cores from 1 to 2. I figured this server will be dealing with logins eventually, networking services (which I'll need to figure out on the Proxmox side) like DHCP and DNS etc, so having a little more CPU power makes sense. Other VMs I create in the future will most likely be single-core CPUs unless I run into compatibility issues which will force my hand into dual cores.
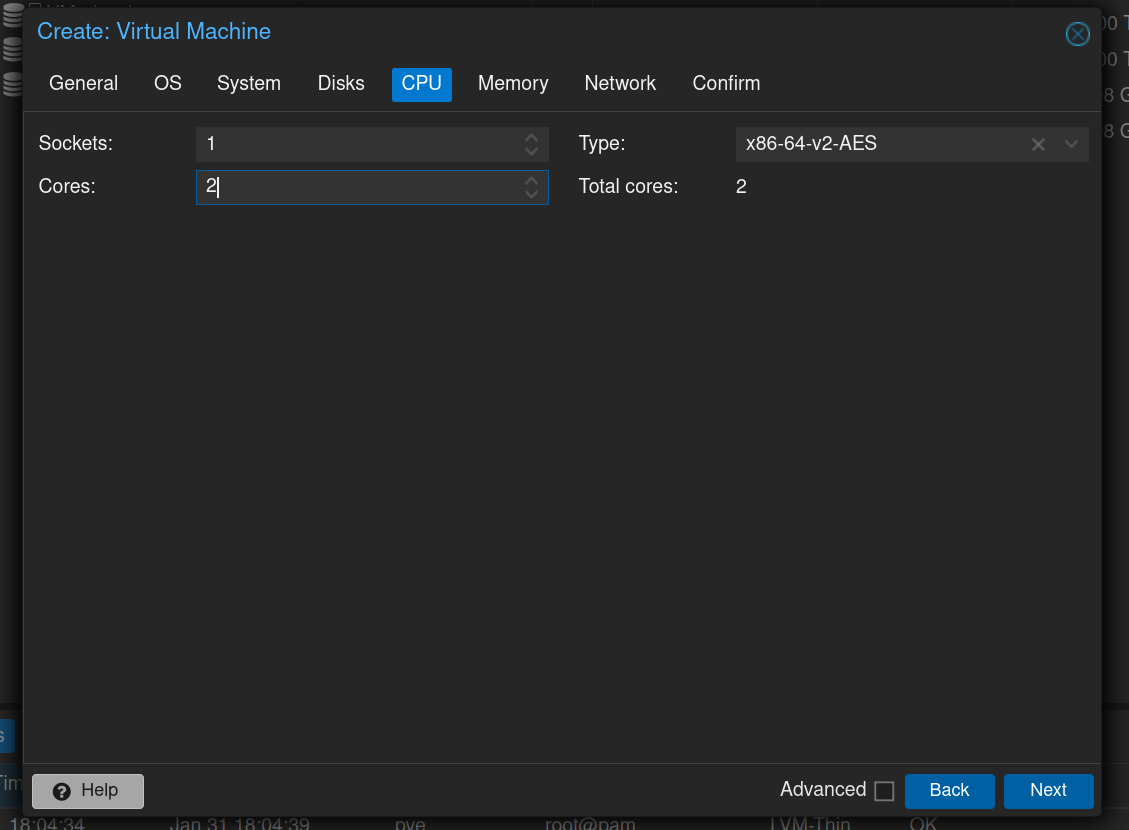
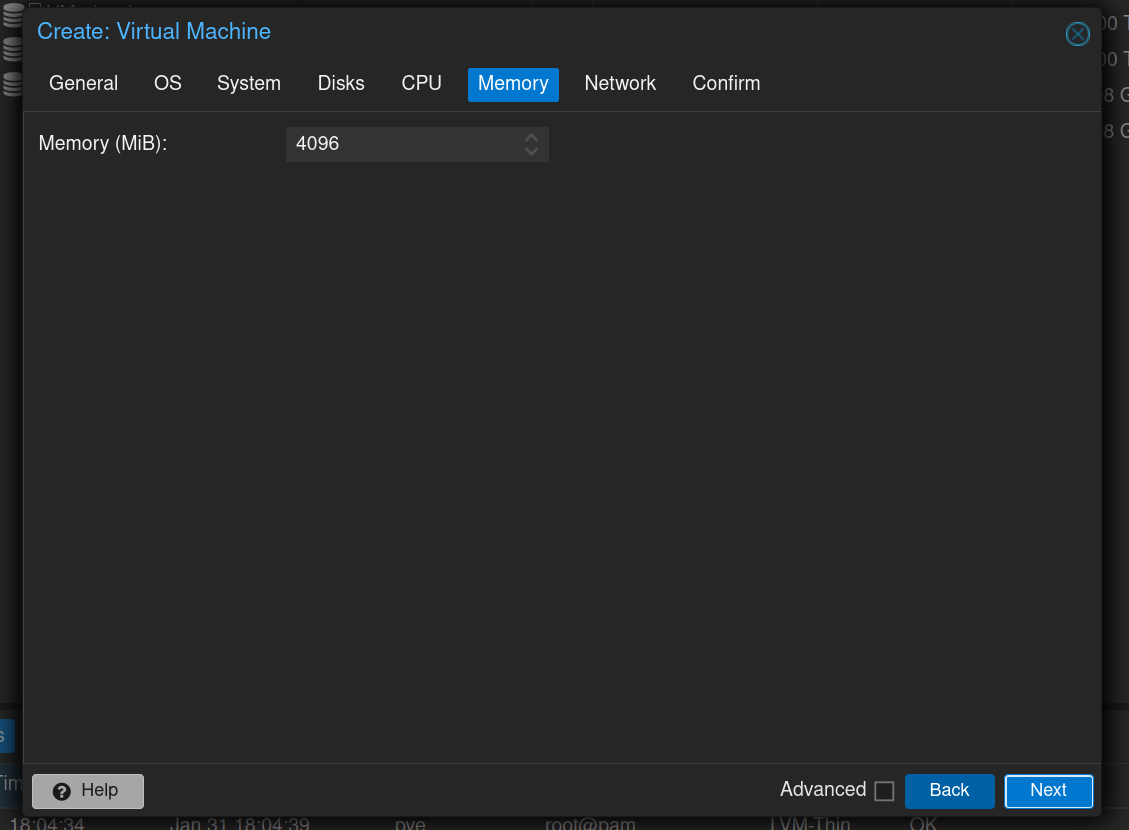
I also chose to up my RAM amounts for my main Domain Controller as well, giving it a healthy 4096MiB. Other VM's will be living in the 2048MiB realm I think.
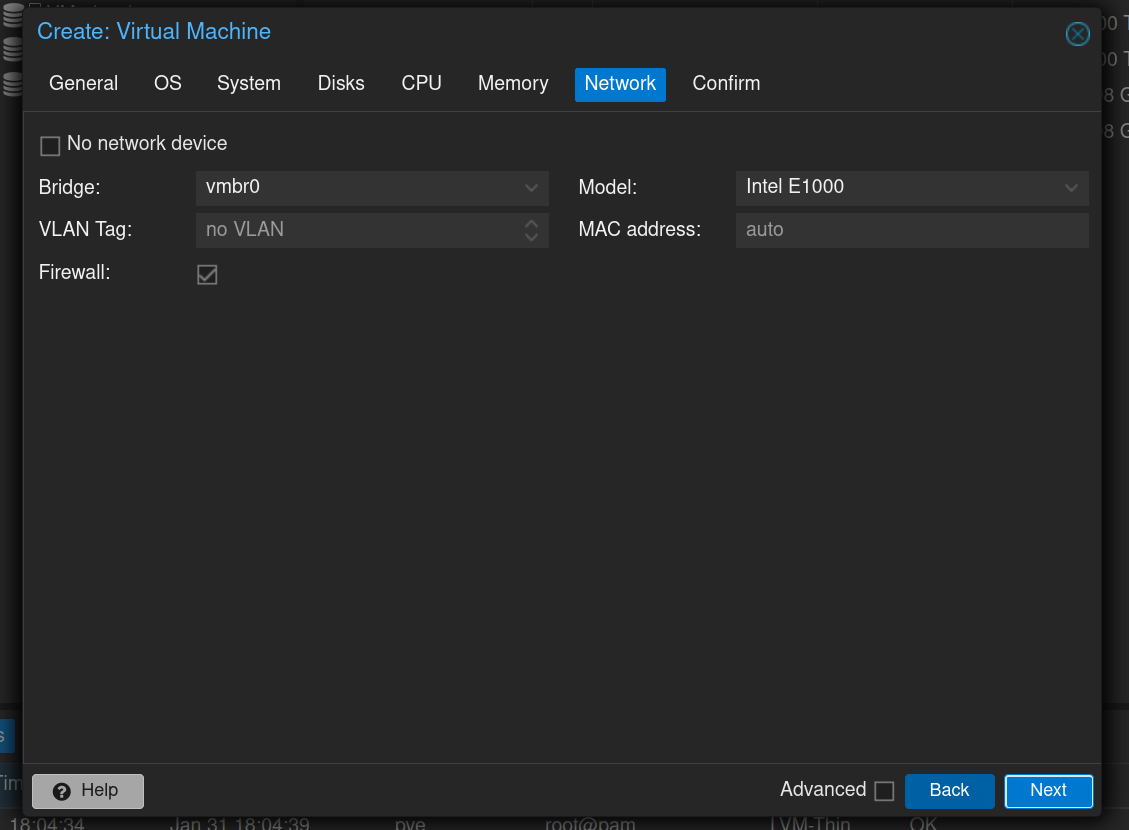
I left my Network settings as the defaults. Like I mentioned above I will want to segregate this network traffic and use the Domain Controller as a NAT server. My thought process here is this will more closely resemble a SMB setup you might find in the wild. Tell me I'm wrong if this approach is silly.
After ALL of these hard choices, I am finally brought to the Confirmation screen. This lets you go through all of your choices and go back if you have made any misconfigurations. There's also a handy checkbox to turn on your VM as soon as you click on Finish. I didn't select this checkbox this time as I wanted to go through some things before starting it up for the first time.
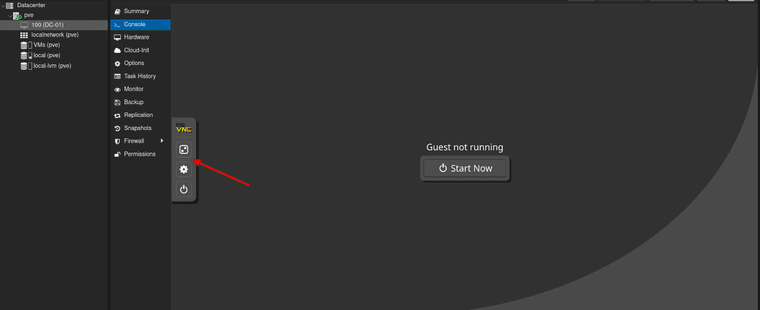
And there it is! VM ID 100! As you can see just to the right of the VM ID is a list of options for various aspects of your new VM. You can check and change Hardware configurations, other options and setup backups, replications and snapshots. What is so cool about using Proxmox is this the cool Console screen which is where you will be working within the VM. TIL that the fine folks at Try Hack Me use Proxmox (or something very similar to it) for their Hack The Box VMs. I recognized the 3 icons in the center from doing their HTB Christmas event this December. Anyways, now just click on that Start Now button and off you go! The VM will boot up. Let go ahead and do that now:
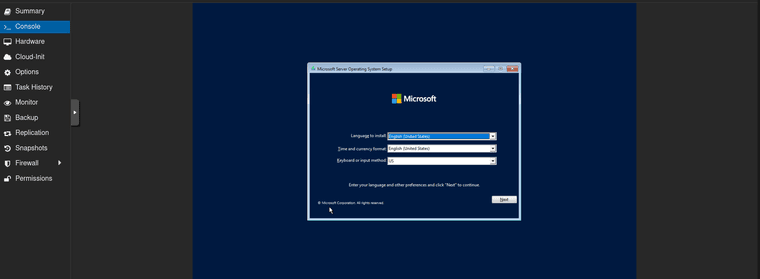
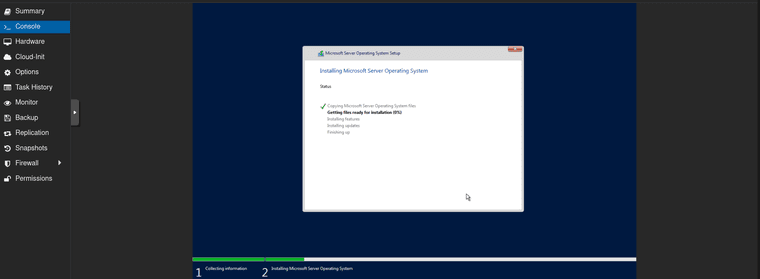
After a few minutes Windows Server 2022 boots up! Select your language, keyboard etc and start going through the initial setup of Windows.
Make sure to select an OS that has a Graphical User Interface (GUI) unless you're a Powershell pro (or are a sucker for punishment?). If you select a non-desktop experience version you will have to run everything in the command line or reinstall Windows.
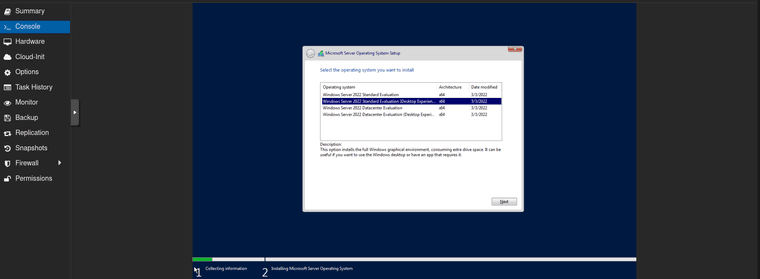
After going through a few more steps like selecting which hard drive to use and accepting the MS licensing agreement you will be all set to begin your installation of Windows Server 2022.
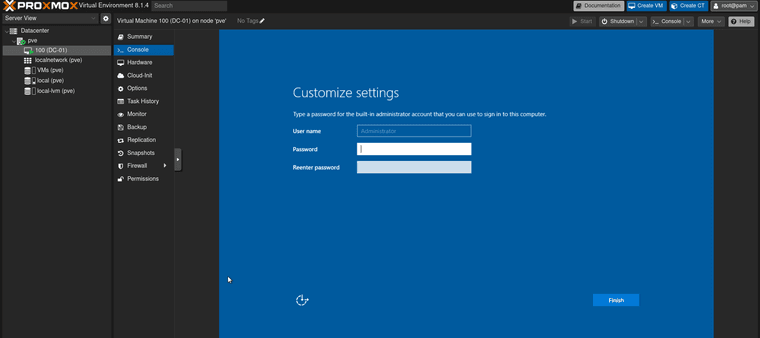
After a few more minutes you will be greeted by the lovely Customization screen for Server 2022 where you will setup you administrator password.
Just a little bit more waiting and logging in with your Administrator password (you didn't forget it did you?), you are now FINALLY logged into Server 2022.
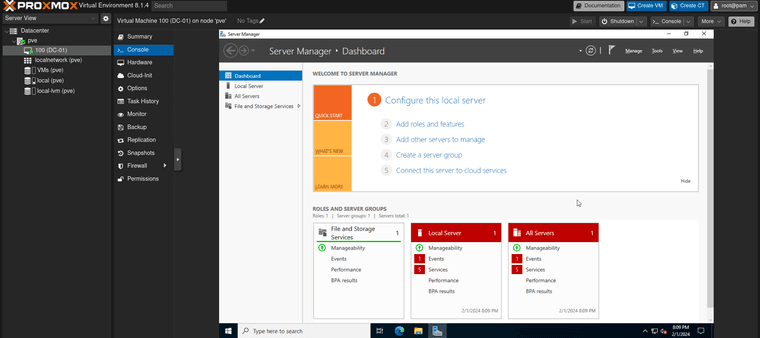
Now we are all set to get started on setting up our Domain Controller with Active Directory and all sorts of other goodies. This is where I will need to put my nose into some books as I am not familiar with the best practice for setting up a DC. Any insights, documentation or YouTube videos from you all would be GREATLY appreciated. I'm thinking the next episode should be a planning session on what services will be needed with scopes, dependencies etc, and my thought process through it all before going ahead and setting these things up. Let me know what you think!
Well, I think I am going to leave it here. Thank you so much for reading through another epically long episode on my adventures with stumbling through Proxmox. I hope you're eyes aren't bleeding too much. If you have any comments, advice or corrections for me please let me know! I love to get all of your comments and learn from you all. I hope you've gotten an opportunity to learn something new too if you are also new to these types of technologies like I am.
Until next time nerds. Have a great weekend!!
-
@Andrew-Despres great end-to-end documentation. I like the step-by-step VM creation process. Thank you for taking the time to document this. If anyone is interested in a Proxmox sandbox, this will be the "go to" thread!