Home Lab for Skills Buidling
-
By all means, keep the content coming... It was a really interesting read.
-
It's that time again! A new episode of my Proxmox HomeLab!
Episode 2: ISOs, VM Settings and Installation
So where I left things off last time I was so excited by the idea of being to just plop in a URL of an ISO download that I never figured out how to get other ISOs from a USB stick or NAS onto my Proxmox server. I was fumbling around, trying to find, read and understand the documentation that I was very confused. The entire time I was struggling away I ignored a VERY obvious UI button that would've made this whole thing a lot simpler. I'll just post a screen shot of said button:
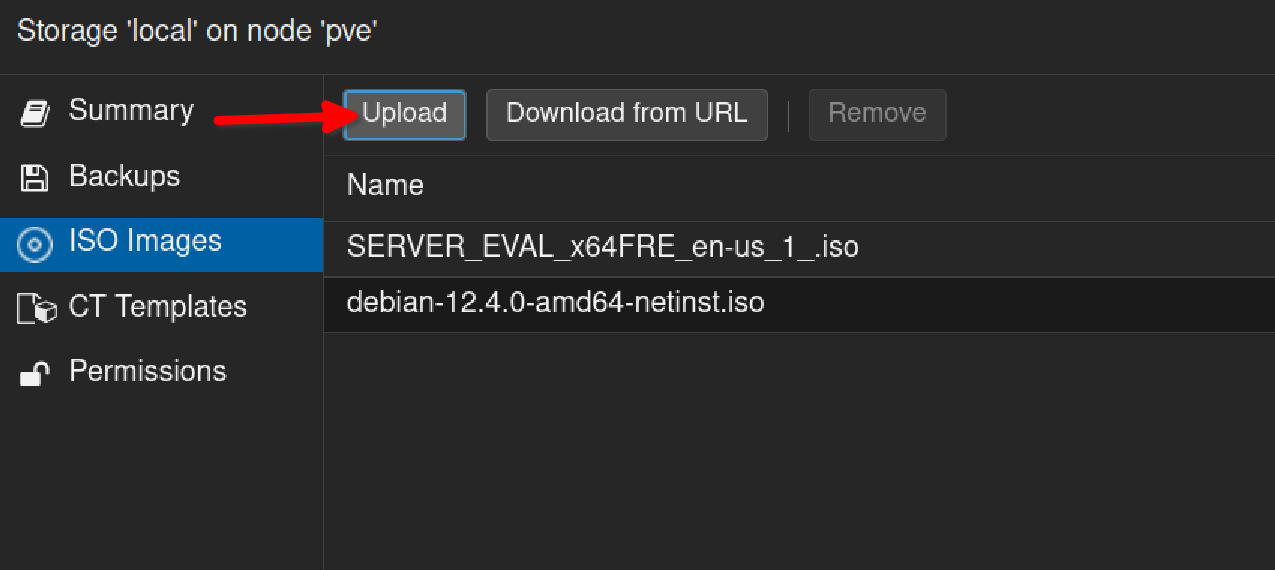
Get your ISOs with this one quick trick! The secret of getting ISOs THEY DON'T WANT YOU TO KNOW! Clicking the upload button and selecting your ISO from your local machines HDD. Reading is a challenge for me apparently haha. Classic IT person trying to think of clever or more complicated ways of performing a task instead of just reading the UI.
After you click upload, select your ISO file and then click upload:
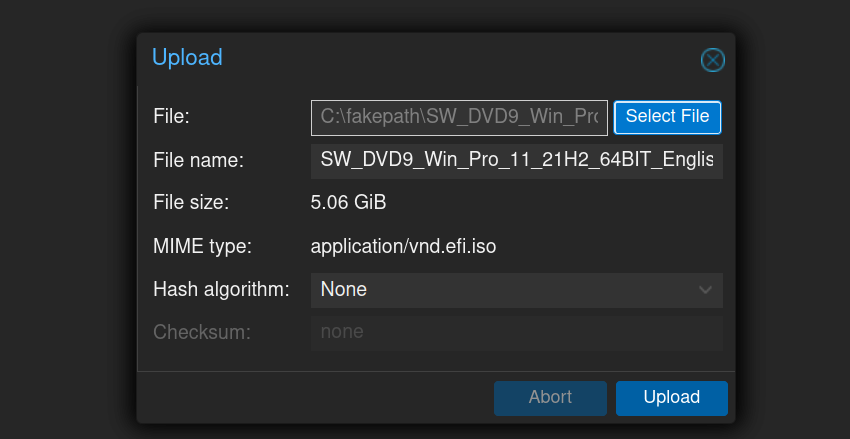
After a few minutes (depending on your network connection) your new ISO file is now located on your Proxmox server, ready to be used to make a VM.
Before I go ahead and start creating the VM I wanted to show the System Summary screen. This can be very helpful in the future to see the health of the VM. You can see CPU usage, RAM usage, Storage capacities etc etc etc. Super helpful screen!
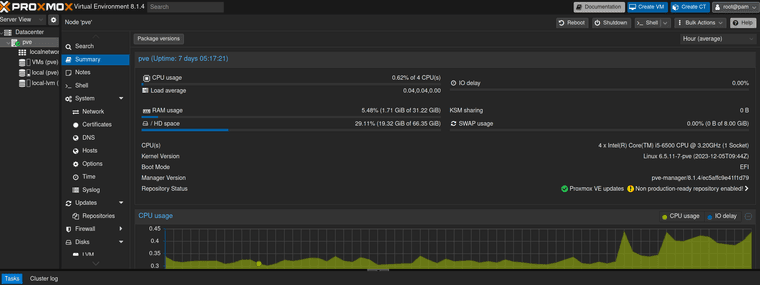
Once I'm done looking at the shiny blue bars and green graph I go ahead and click the "Create VM" button in the top right side of the screen. Clicking this button brings you to the first configuration page of your soon to be VM:
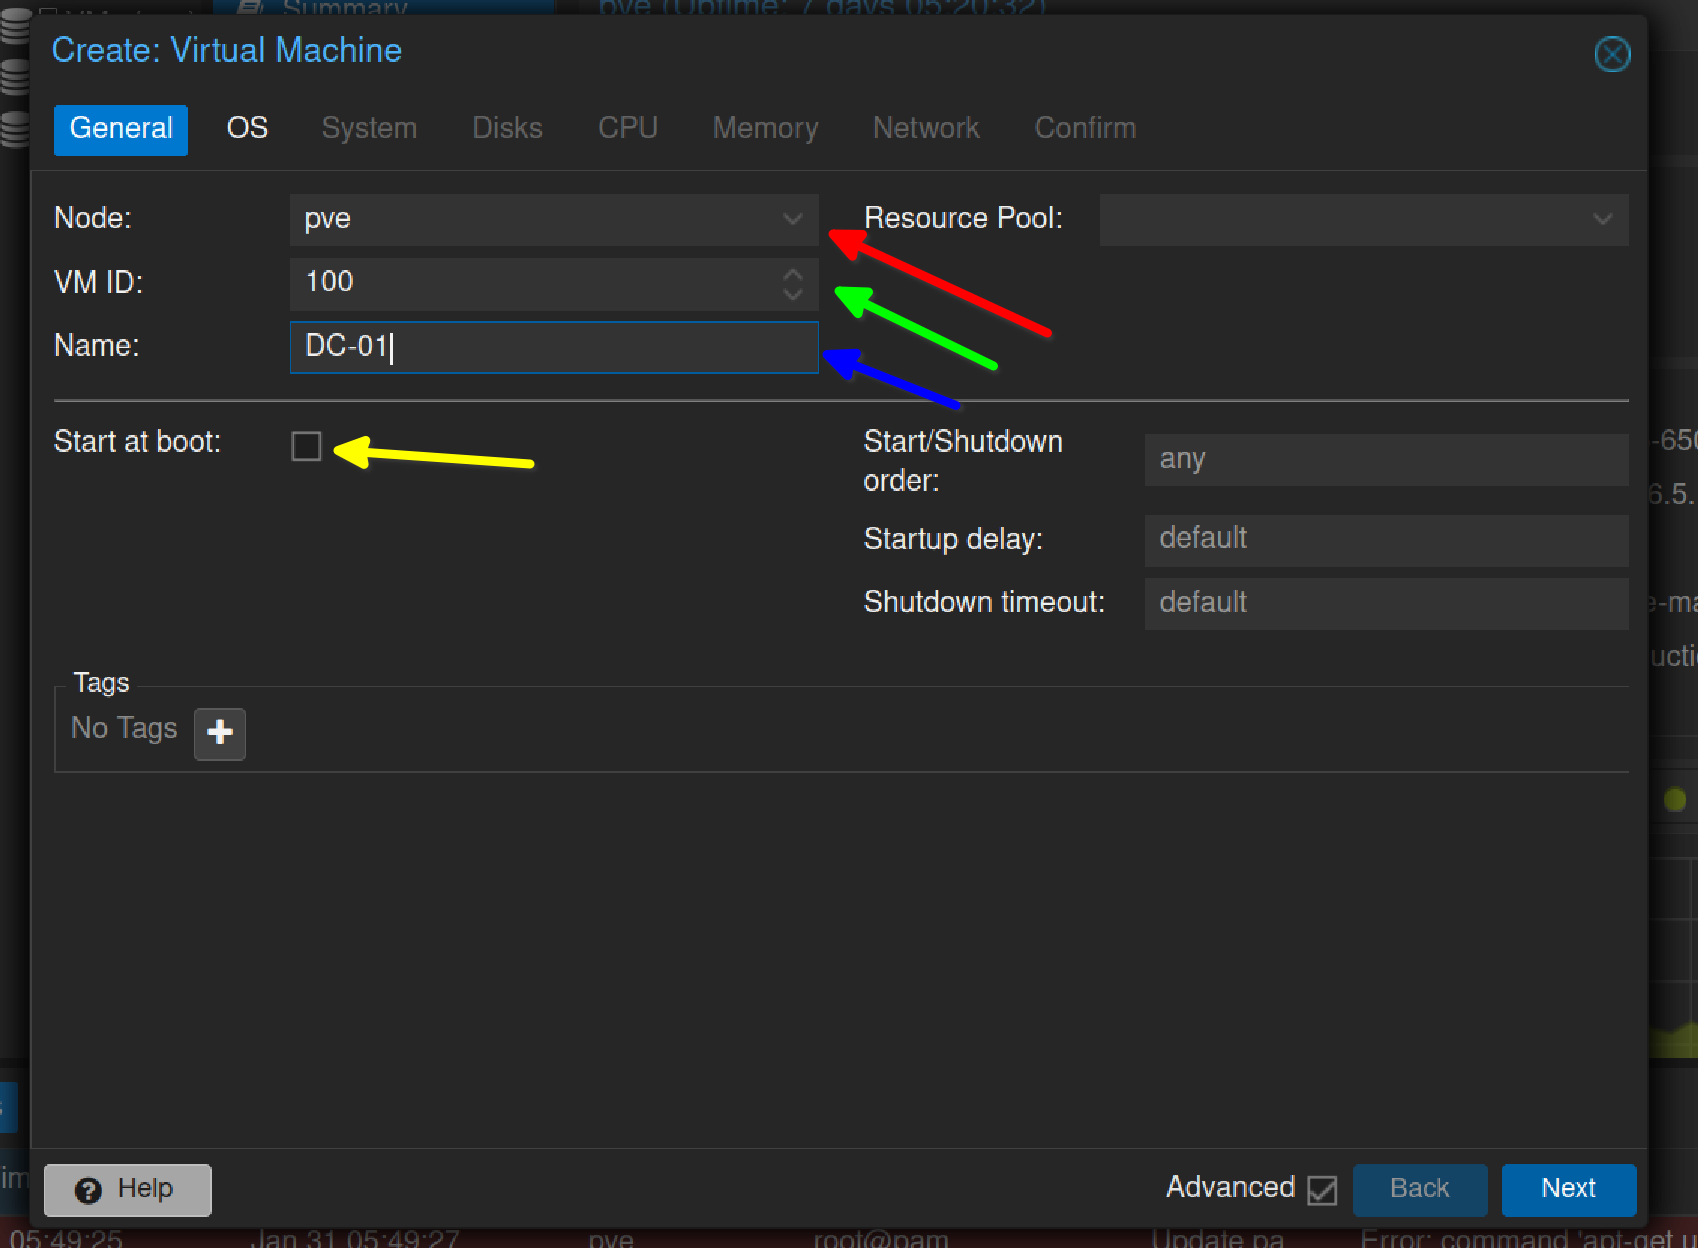
Some important things to point out here that I have colored arrows pointing to:
The red arrow is pointing to your Node, or your "Proxmox instance" as I'll call it (if you have a better descriptor for it please let me know!). Essentially if you have multiple Nodes you can create new VMs in these different instances. It might not seem relevant now, and it kind of isn't, but, this can be VERY useful for redundancy. For example, lets say you need to run maintenance on Node 1, you could then migrate you VMs over to Node 2 and Node 3 and keep them online. This would be mission critical for you so your clients don't lose access to that super important File Server or Print Server. Ugh, printers....shudder.
Something to keep in mind too while we're discussing this topic of migrating machines is that you can migrate VMs, but not Containers. If you need to move a container over Proxmox will run scripts on the container to safely shut it down, migrate it and then boot it back up.
Green VM ID: This is just a number that Proxmox wants to assign your VM. If you're super hardcore, you will have a number schema already selected ahead of time. 100-199 could be VMs, 200-299 can be containers etc. If you do nothing with this number, Proxmox will just increase its number by 1 each time you create a new VM.
Blue Name: Make sure to give your soon to be VM a clever, or in my case, an incredibly utilitarian name. Since my first VM will be running Windows Server 2022 I have called it DC-01. Putting my security hat on, you may not want to use a naming system like this in case you are ever compromised. With a name like DC-01 it gives any potential bad actor a pretty clear target to start to brute force. Just like the VM IDs, you will want to plan this ahead of time. Maybe use something from pop culture, Star Trek=Starbase-01, Star Wars=Millennium-Falcon, Lord of the Rings=Mordor etc, or something simple likes colours, car brands, whatever you like. JUST MAKE SURE TO DOCUMENT IT SOMEWHERE!
Lastly is the yellow arrow, Start at Boot. Check this box if you want this VM to autostart when Proxmox reboots. Super helpful if this is critical infrastructure and you need that Domain Controller back up ASAP. You can even give Proxmox instructions on which VMs to boot up first in case you have any servers that are dependent on others. With all of that done lets move on to the next section, OS Selection.
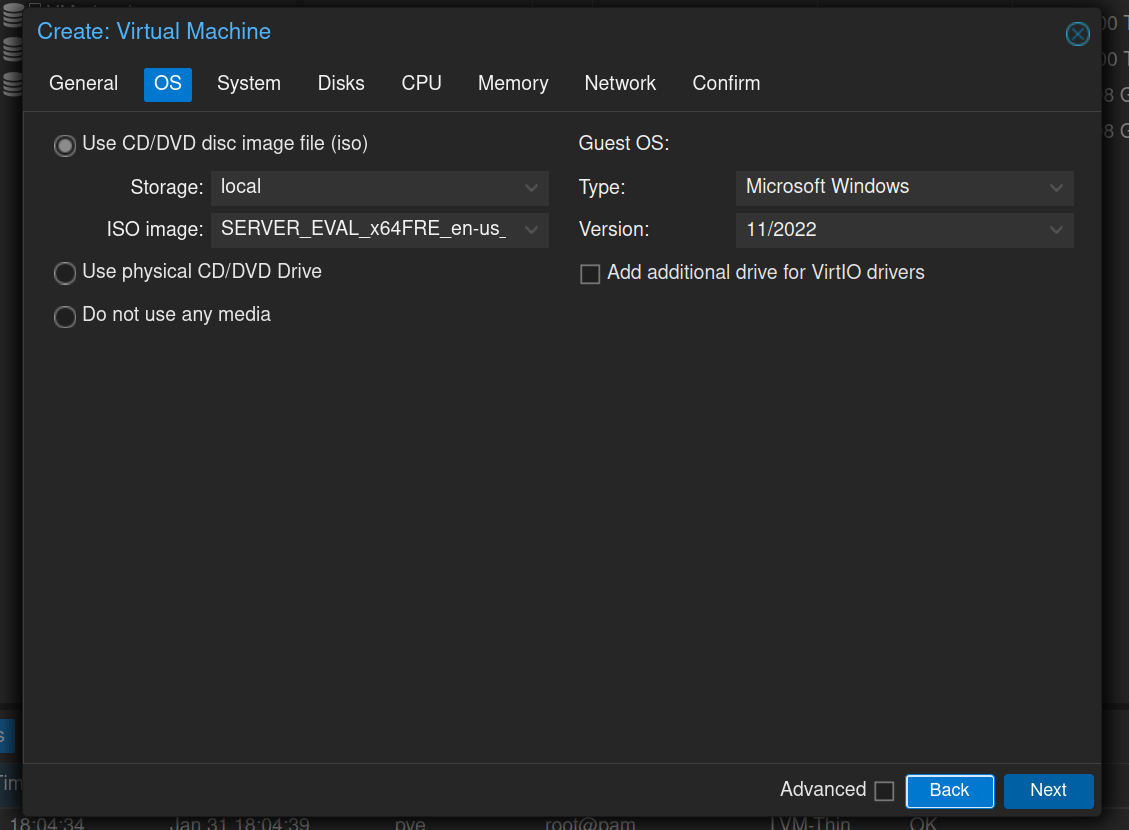
For your first boot up you will want to select the option of Use CD/DVD disc image file. Please do not get confused like me where it says Storage. I was of the mindset that this is where my VM will be installed and it always defaulted to my PVE drive which is the local Proxmox HDD. This Storage section is asking you where to look for ISO files. Change your GuestOS settings, in my case I selected Windows and selected the Win11/Server2022 version. Now onto System.
The system section is essentially your BIOS/UEFI settings. Here you can select what kind of SCSI controllers you want to use, where to store your TPM keys and where you want your VHDD to live. I selected the VMs disk as this is that nice shiny 1TB NVME drive I purchased way back in episode 0. For the most part as I'm aware, these settings can largely remain as default.
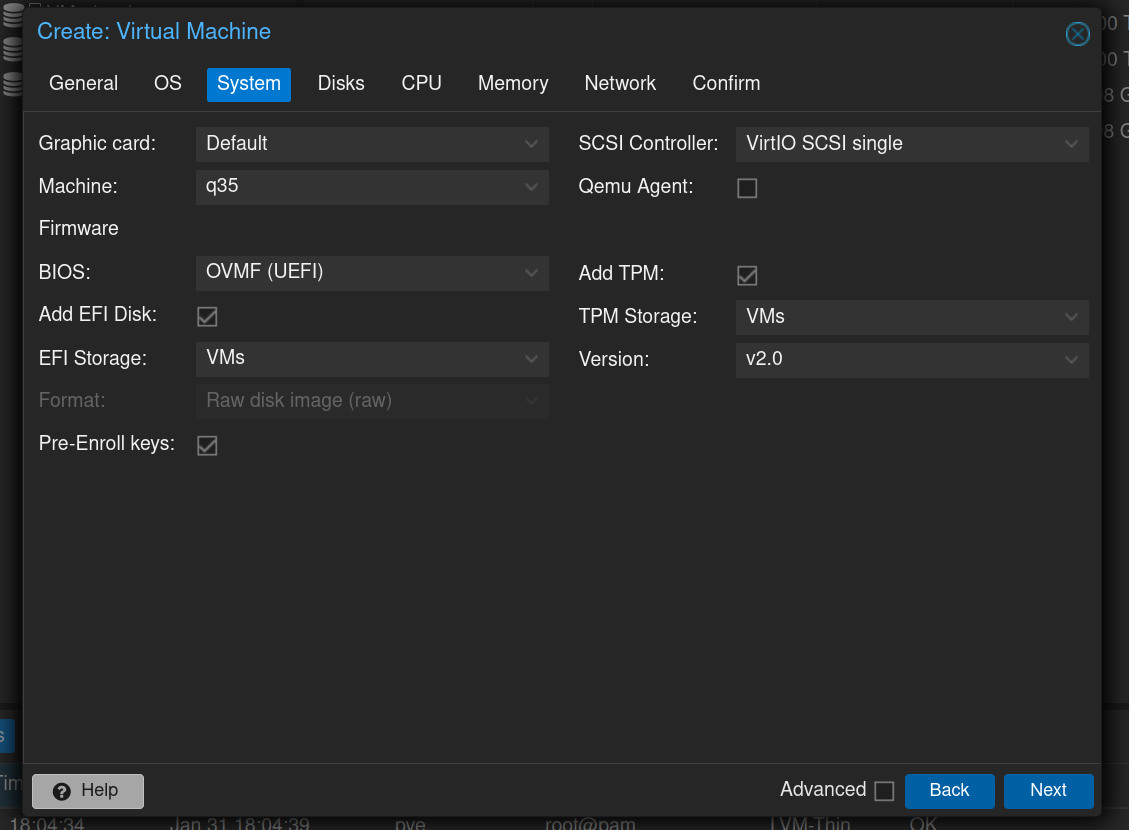
NOTE When I started writing this episode I learned that there are important optimization settings that I should do for Windows VMs in Proxmox. I haven't gone through all of these settings yet, but I have found some awesome documentation about these optimizations like what VirtIO drivers are, QEMU Agents as well as an awesome video by Learn Linux TV about setting up a Windows VM in Proxmox. I'm also following his Proxmox VE Full Course to learn more about the in's and out's of Proxmox. Give him a follow if you're interested in Proxmox or learning more about Linux! With all of that said, I will be making an episode 2.1 going through these important optimizations and correcting any mistakes I may have made here. I didn't want to keep this episode waiting for much longer as its been WAY too long since Episode 1 came out.
Next is Disk options. This is where you will set options for the virtual HDD that your system will use. You will need to pay very special attention to some of the settings in this section. By default, Proxmox will attach the Virtual HDD to your system as an HDD (mechanical drive) even if you're actually using an SSD. So, if you're using a SSD, make sure to turn on advanced options and select SSD emulation as well as the Discard checkbox. SSD emulation will let the GuestOS see the drive as an actual SSD and Discard turns on the "TRIM" feature for the SSD. TRIM is super important for the overall health and lifespan of your SSD so please make sure its on. The fine folks at Kingston Technology put it really well on their website:
"TRIM is a command for the ATA (Advanced Technology Attachment) interface. When the operating system needs to tell the SSD it’s deleting files and that those file pages need to be made available for new information, TRIM provides that functionality. In combination with Garbage Collection, TRIM works to clean up and organize your SSD, making it more efficient and prolonging its lifespan."
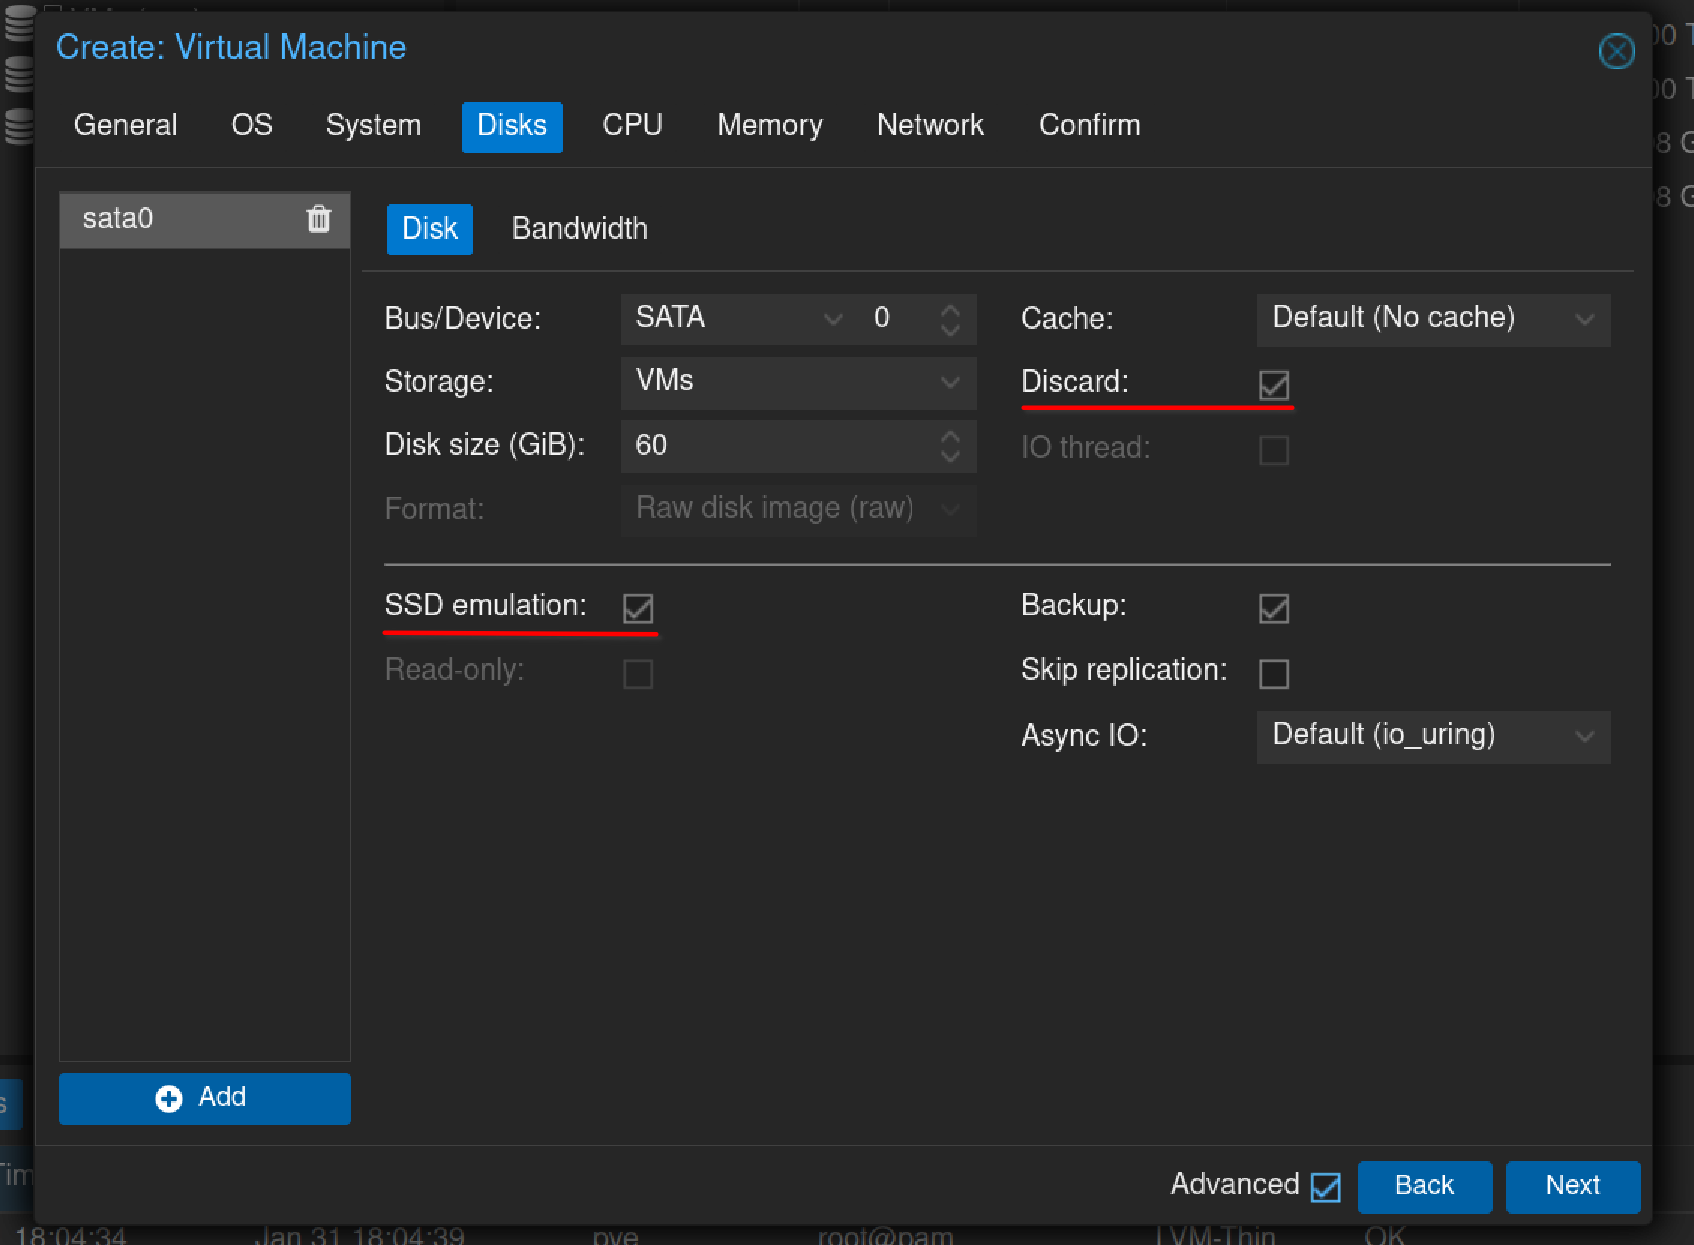
After some consultation with an old work colleague and scouring the internet for various opinions, I decided with 60GB for my virtual HDD size. This seems reasonable as I don't think the services that I plan on putting on this Domain Controller should take up that much space. Maybe I'll be proven wrong. I guess we'll find out in the not so far future! Maybe there's a way I could expand (or contract) the storage on the VM as well. I know this is possible in Hyper-V, I'm sure there's something for Proxmox.
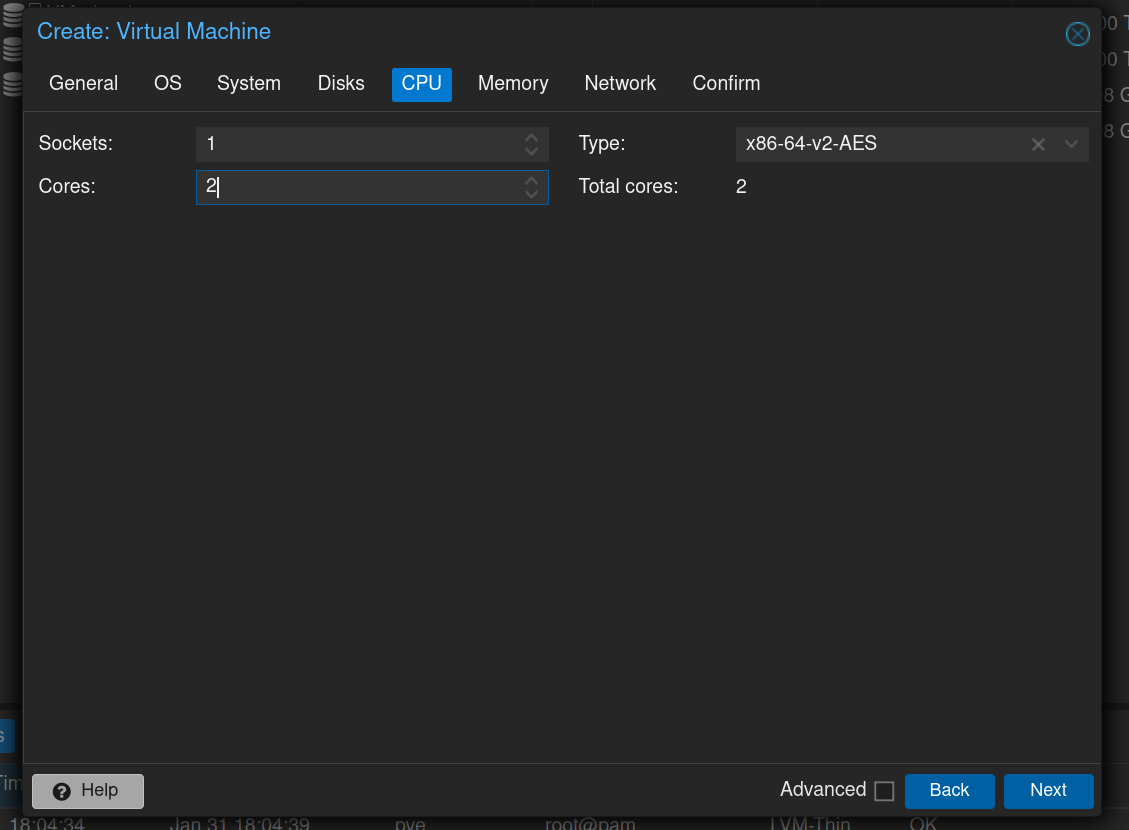
Next is CPU settings. I bumped up my CPU cores from 1 to 2. I figured this server will be dealing with logins eventually, networking services (which I'll need to figure out on the Proxmox side) like DHCP and DNS etc, so having a little more CPU power makes sense. Other VMs I create in the future will most likely be single-core CPUs unless I run into compatibility issues which will force my hand into dual cores.
I also chose to up my RAM amounts for my main Domain Controller as well, giving it a healthy 4096MiB. Other VM's will be living in the 2048MiB realm I think.
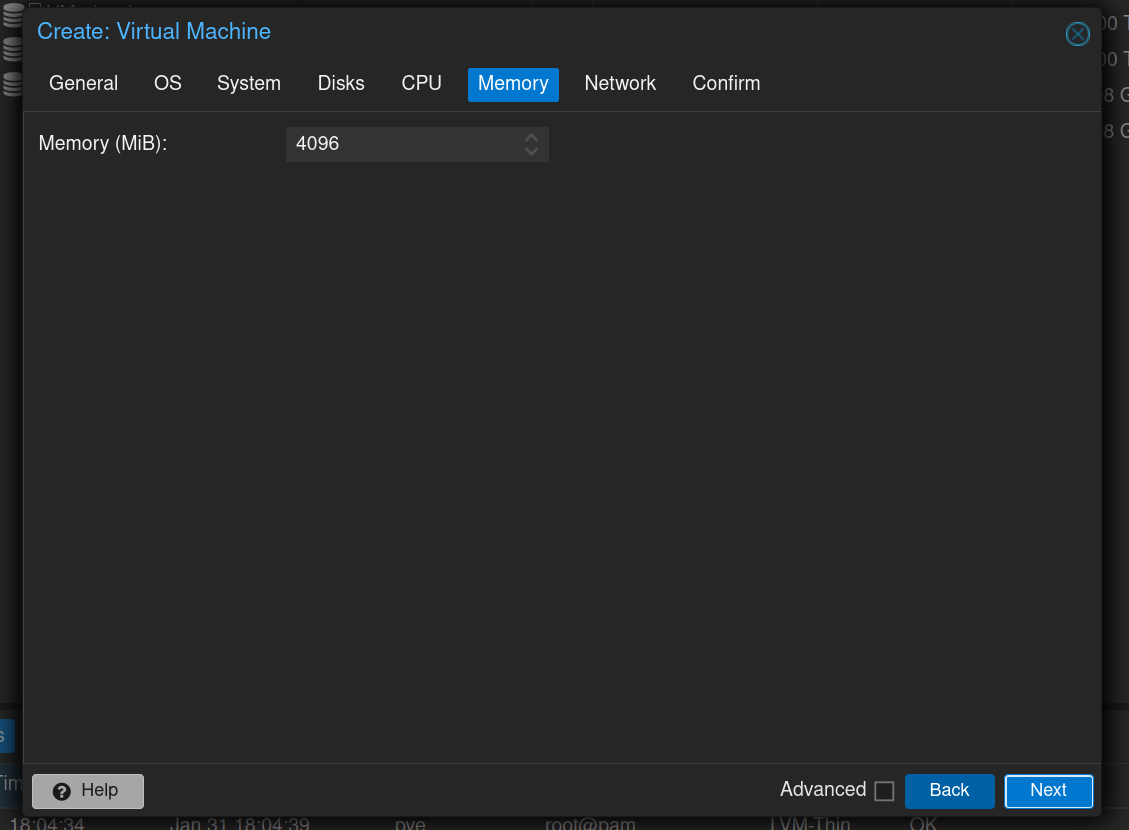
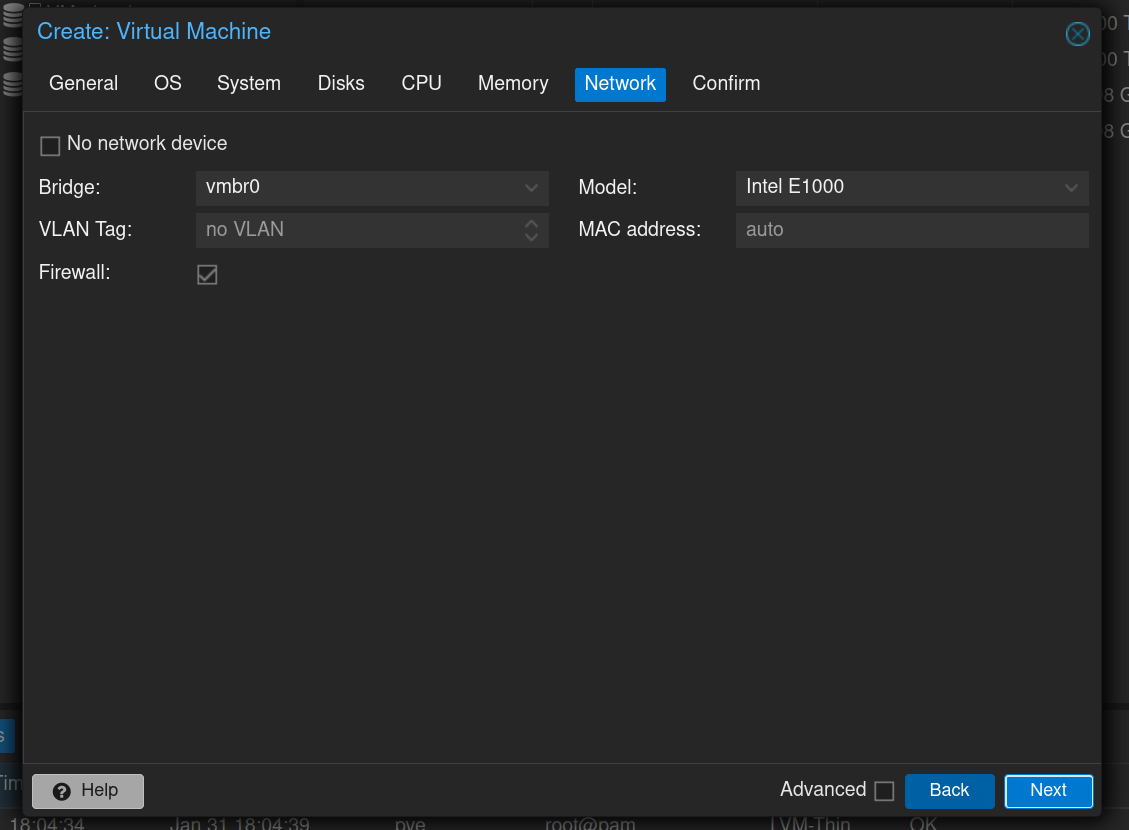
I left my Network settings as the defaults. Like I mentioned above I will want to segregate this network traffic and use the Domain Controller as a NAT server. My thought process here is this will more closely resemble a SMB setup you might find in the wild. Tell me I'm wrong if this approach is silly.
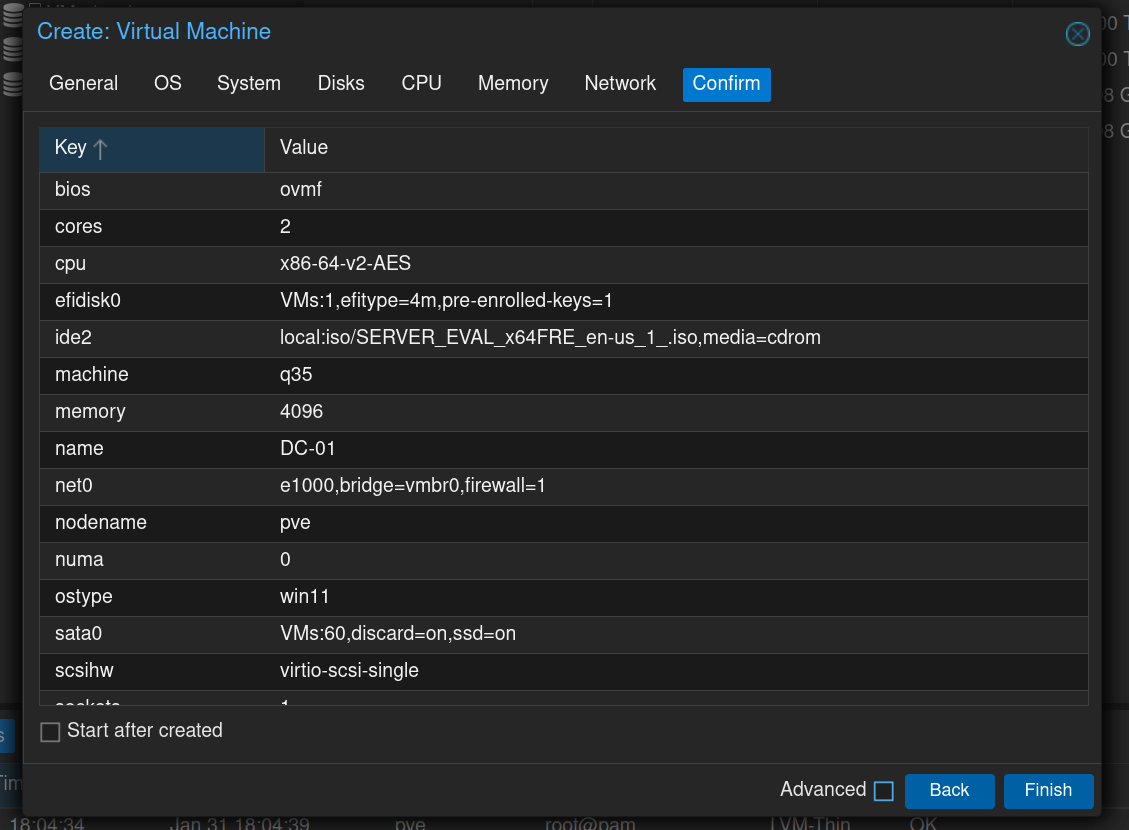
After ALL of these hard choices, I am finally brought to the Confirmation screen. This lets you go through all of your choices and go back if you have made any misconfigurations. There's also a handy checkbox to turn on your VM as soon as you click on Finish. I didn't select this checkbox this time as I wanted to go through some things before starting it up for the first time.
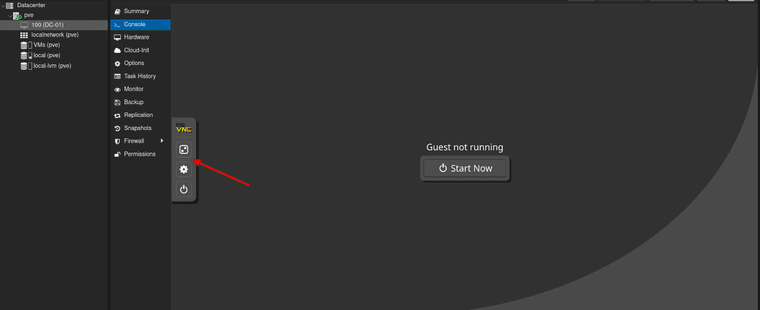
And there it is! VM ID 100! As you can see just to the right of the VM ID is a list of options for various aspects of your new VM. You can check and change Hardware configurations, other options and setup backups, replications and snapshots. What is so cool about using Proxmox is this the cool Console screen which is where you will be working within the VM. TIL that the fine folks at Try Hack Me use Proxmox (or something very similar to it) for their Hack The Box VMs. I recognized the 3 icons in the center from doing their HTB Christmas event this December. Anyways, now just click on that Start Now button and off you go! The VM will boot up. Let go ahead and do that now:
After a few minutes Windows Server 2022 boots up! Select your language, keyboard etc and start going through the initial setup of Windows.
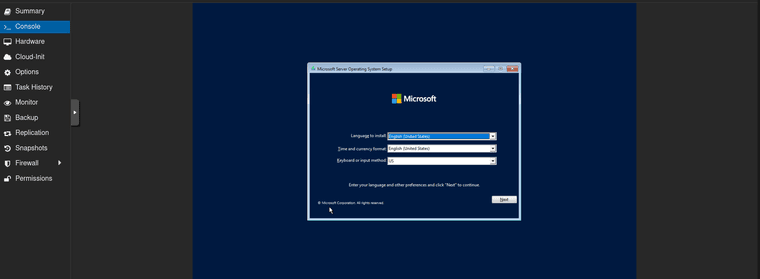
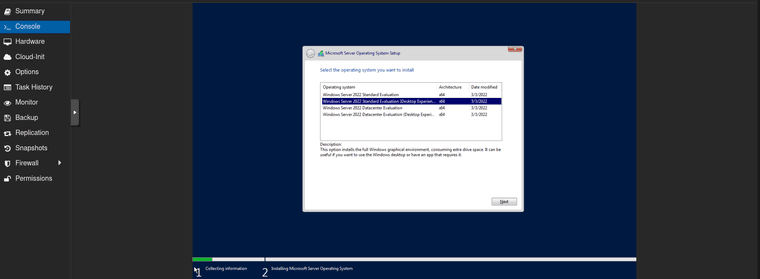
Make sure to select an OS that has a Graphical User Interface (GUI) unless you're a Powershell pro (or are a sucker for punishment?). If you select a non-desktop experience version you will have to run everything in the command line or reinstall Windows.
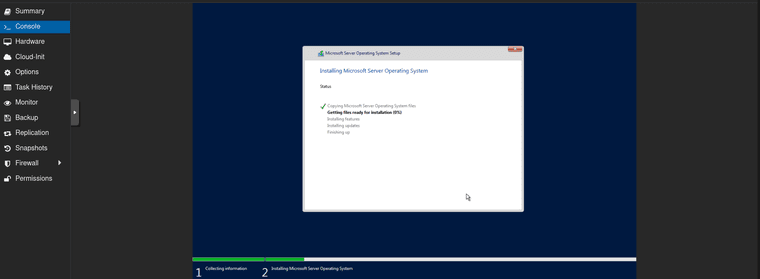
After going through a few more steps like selecting which hard drive to use and accepting the MS licensing agreement you will be all set to begin your installation of Windows Server 2022.
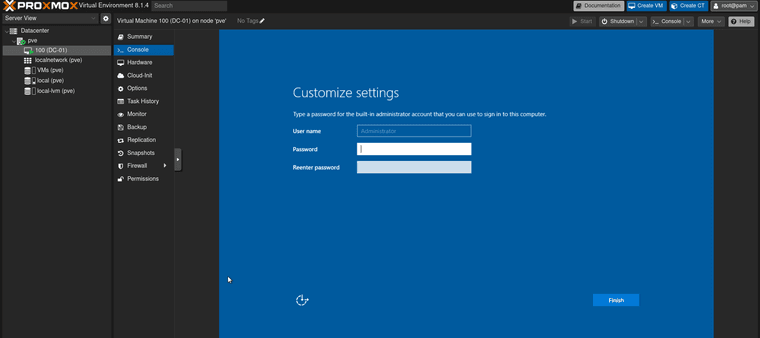
After a few more minutes you will be greeted by the lovely Customization screen for Server 2022 where you will setup you administrator password.
Just a little bit more waiting and logging in with your Administrator password (you didn't forget it did you?), you are now FINALLY logged into Server 2022.
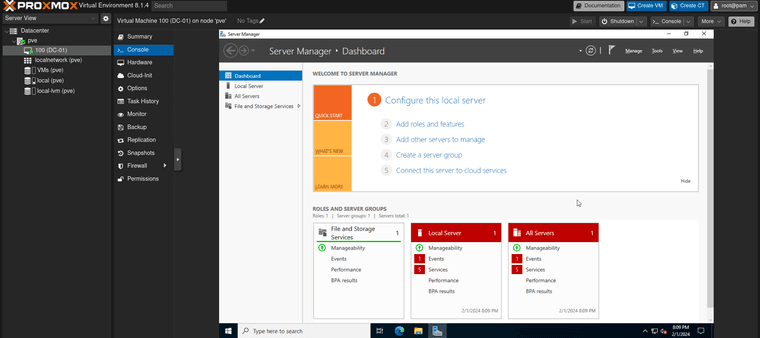
Now we are all set to get started on setting up our Domain Controller with Active Directory and all sorts of other goodies. This is where I will need to put my nose into some books as I am not familiar with the best practice for setting up a DC. Any insights, documentation or YouTube videos from you all would be GREATLY appreciated. I'm thinking the next episode should be a planning session on what services will be needed with scopes, dependencies etc, and my thought process through it all before going ahead and setting these things up. Let me know what you think!
Well, I think I am going to leave it here. Thank you so much for reading through another epically long episode on my adventures with stumbling through Proxmox. I hope you're eyes aren't bleeding too much. If you have any comments, advice or corrections for me please let me know! I love to get all of your comments and learn from you all. I hope you've gotten an opportunity to learn something new too if you are also new to these types of technologies like I am.
Until next time nerds. Have a great weekend!!
-
@Andrew-Despres great end-to-end documentation. I like the step-by-step VM creation process. Thank you for taking the time to document this. If anyone is interested in a Proxmox sandbox, this will be the "go to" thread!
-
Wow, this is awesome. Been looking to start tinkering with Proxmox. Thanks, @Andrew-Despres!
-
Thank you @David-Thompson and @wes-bryan ! I appreciate the kudos :)
@wes-bryan , being the server guru around here, do you know of any best practices for setting up a Domain controller? I have my Server+ but that just talks about the services in general and doesn't necessarily talk about configuring a DC.
Appreciate any feedback you might have for me :)
-
Hey @Andrew-Despres here is a link to a blog post: https://techcommunity.microsoft.com/t5/security-compliance-and-identity/updating-best-practices-for-domain-controllers/ba-p/3263043
In this post, the discussion is on updated best practices for Windows DCs. Not a very long read, but some great points.
-
Huzzah! Thank you @wes-bryan ! You're the best :)
-
 A Andrew Despres referenced this topic on
-
Hey everyone!
I'm hoping to have another update coming in the next few days. It's been a heck-of-a couple of weeks between work and the plague not leaving my home.
Sorry for keeping you all waiting and thanks for coming along this journey with me :)
-
Getting withdrawals, @Andrew-Despres. Need more content!
-
It's time for another bonus episode!
This will be episode 2.1: Windows, Virtio, QEMU...Oh my!
As I mentioned in the previous episode, there are some special things to keep in mind when it comes to installing Windows in Proxmox. After going through the video "Launching a Windows VM in Proxmox" by Learn Linux TV I was able to understand how to use Virtio drivers and get the QEMU agents working.
Before we begin, you might be thinking, "Why should I do this? I was able to get my VM installed no issues without these steps." The short answer has been summed up right within the Proxmox documentation:
"VirtIO Drivers (download link here) are paravirtualized drivers for kvm/Linux. In short, they enable direct (paravirtualized) access to devices and peripherals for virtual machines using them, instead of slower, emulated, ones. "
What this all means is by using Virtio, you are using "Paravirtualization" which allows for better performance for your VM which gives the VM direct access to the devices and peripherals connected to the VM as-opposed to emulated drivers which are slower.
"Whats a QEMU agent? Is that important?"
QEMU is an abbreviation that means Q(uick) EMU(lator) which is a free and open-source emulator that emulates a computers processor through dynamic binary translationand provides a set of different hardware and device models for the machine, enabling it to run a variety of guest operating systems. It can interoperate with Kernel-based Virtual Machine (KVM) to run virtual machines at near-native speed. QEMU can also do emulation for user-level processes, allowing applications compiled for one architecture to run on another.
Now with that out of the way we can finally begin deploying a Windows VM correctly using Proxmox!
First thing you you will want to do is actually download the Virtio drivers. I put a link earlier in the thread. Like I mentioned in previous episodes you can add these ISO files easily right within Promox and download them within the client itself by clicking on the "Download from URL" button and pasting the URL:
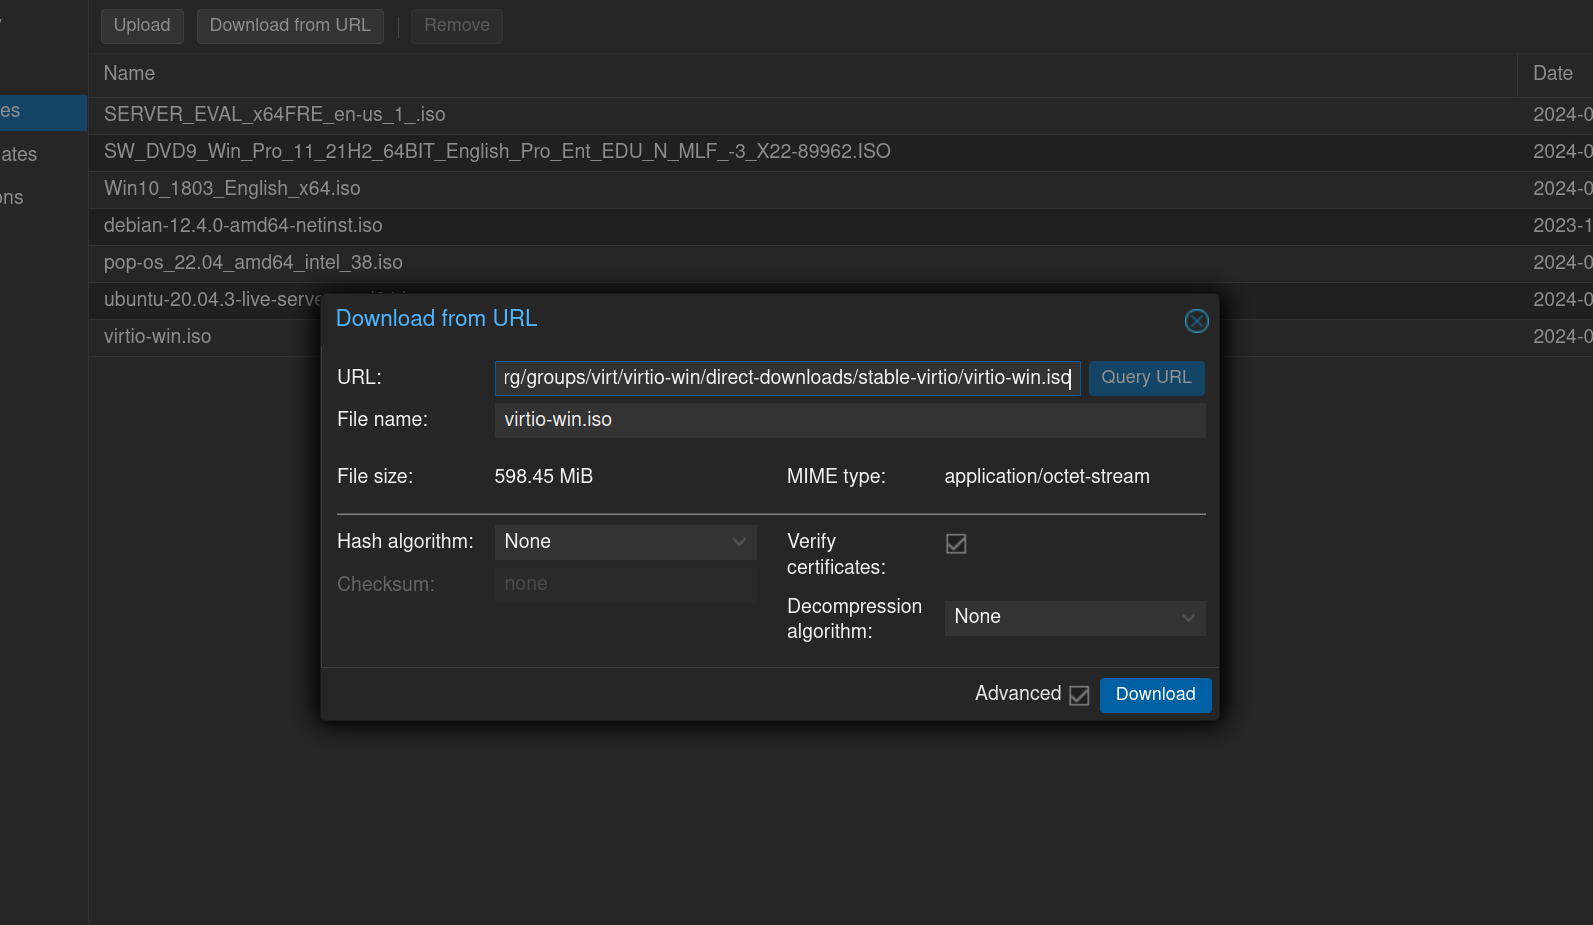
Now that the Virtio ISO is downloaded, let create a new VM by clicking the Create VM button in the top right corner of our Proxmox instance. We can mostly go through the same installation process as I mentioned before but I will mark any changes that may need to be made below.
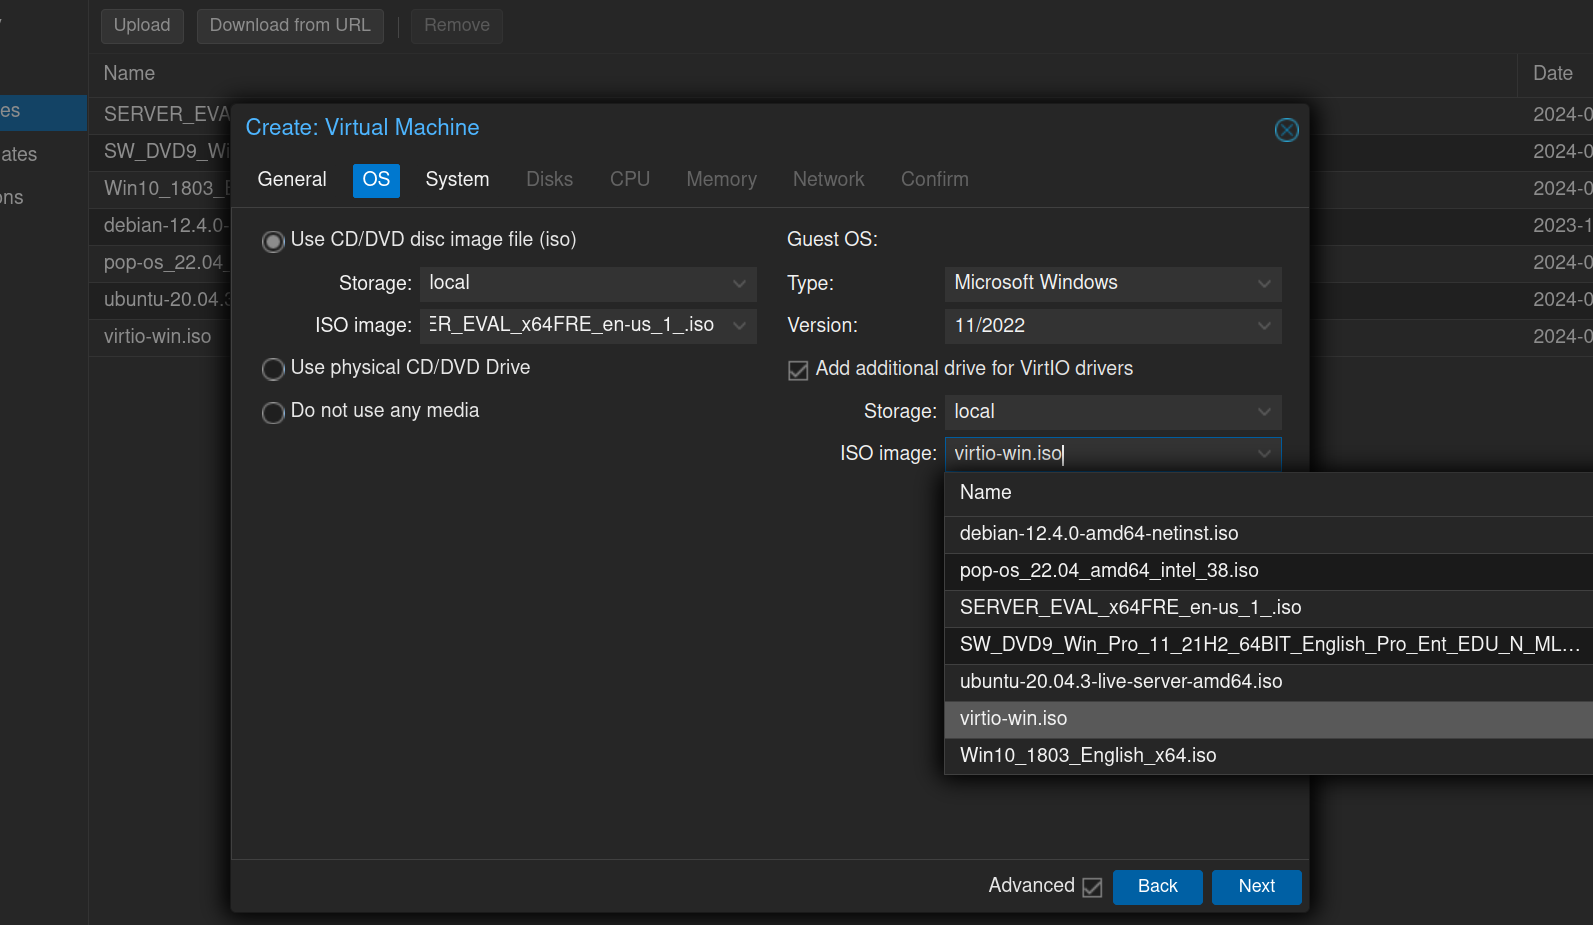
The first difference is on the OS tab. In this tab there is a checkbox to add an additional drive for our Virtio ISO. Super handy! Click the checkbox and find the location where you Virtio ISO:
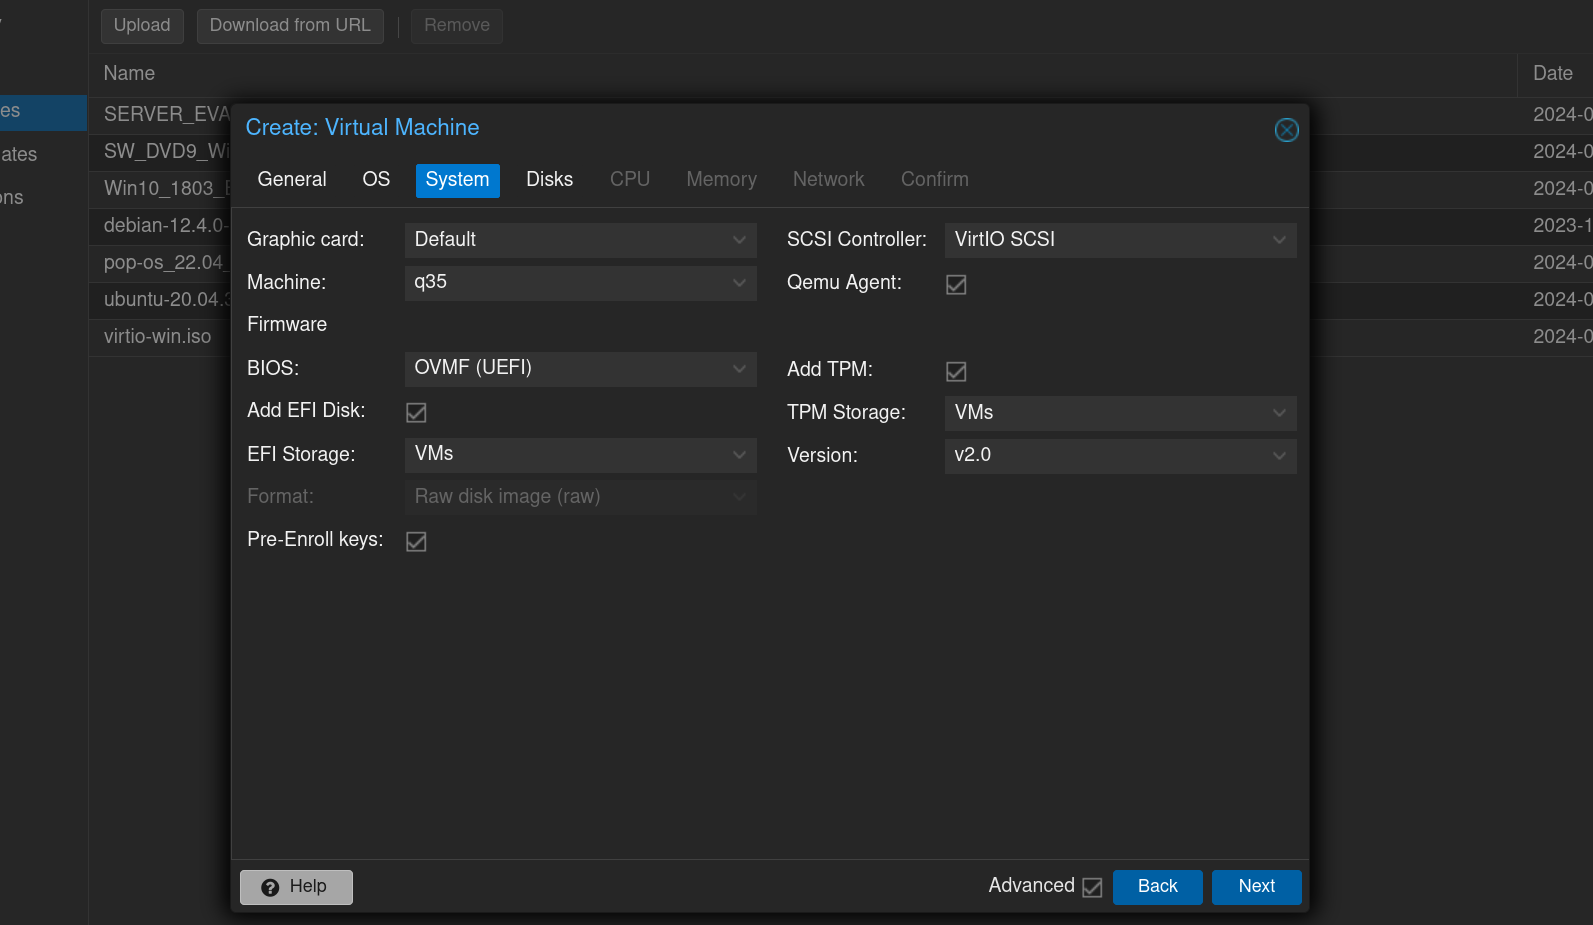
Next on the System tab, make sure to hit the checkbox for the QEMU agent. This will make sure the agent will be enabled when we install the software:
Next on Disk, select SCSI for your disk and select Write Back for the Cache option. Write back should help increase performance:
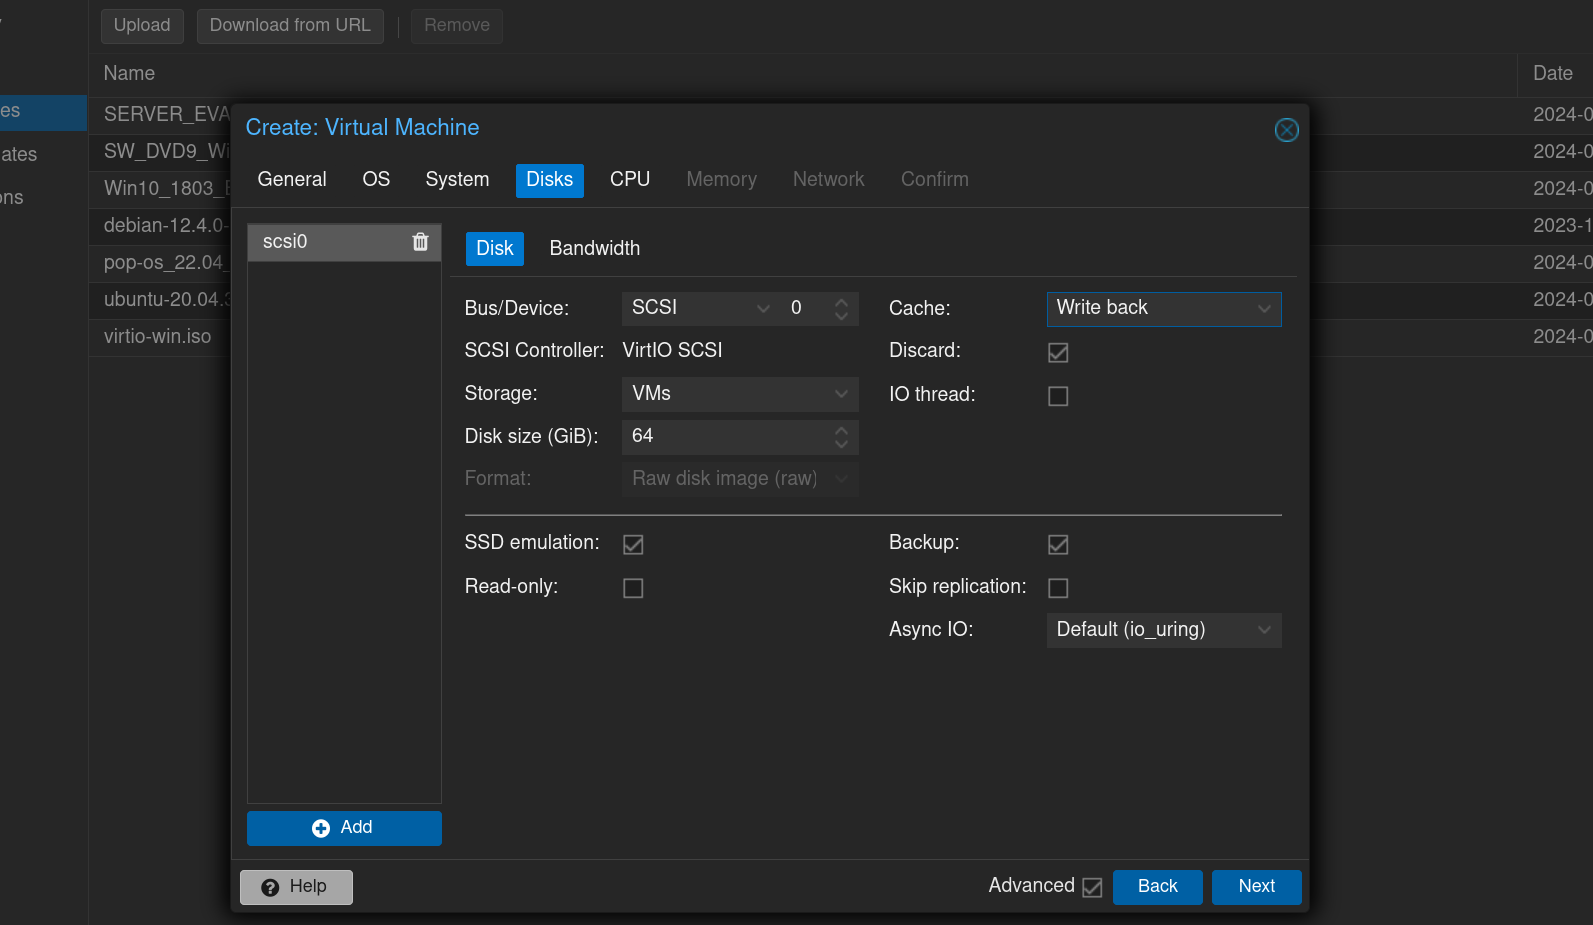
And that was the last difference for the Create VM portion. All of these changes are the recommended settings that Proxmox dictates. Now, because we chose the option to add an addtional drive for Virtio drivers, we do not need to do anything else with our VM, we can now start it. Make sure that the virtual DVD drive with the Server 2022 ISO file is first in the boot order! Your IDE drive order should look like the image below. Notice that my Server 2022 drive is set to 0 and my Virtio drive is set to 1:
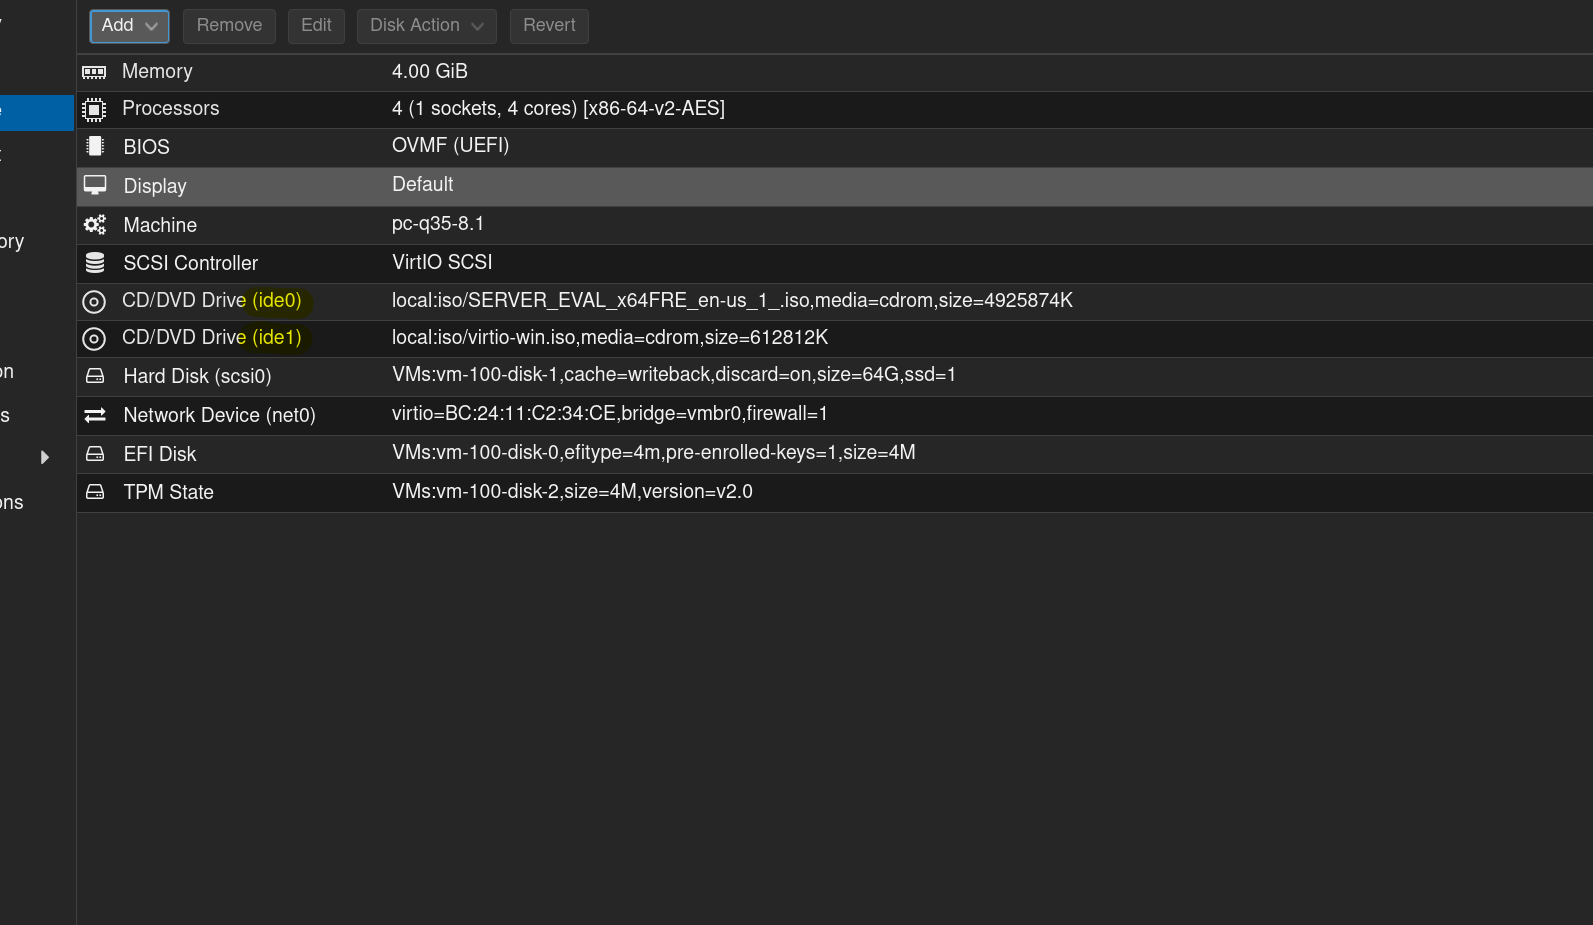
Please note, you might need to smash your "Any key" (mines spacebar) as soon as you boot your VM. If you don't you will miss the option to continue to boot to Windows and then your VM will move to the next device which will be your Virtio DVD drive.
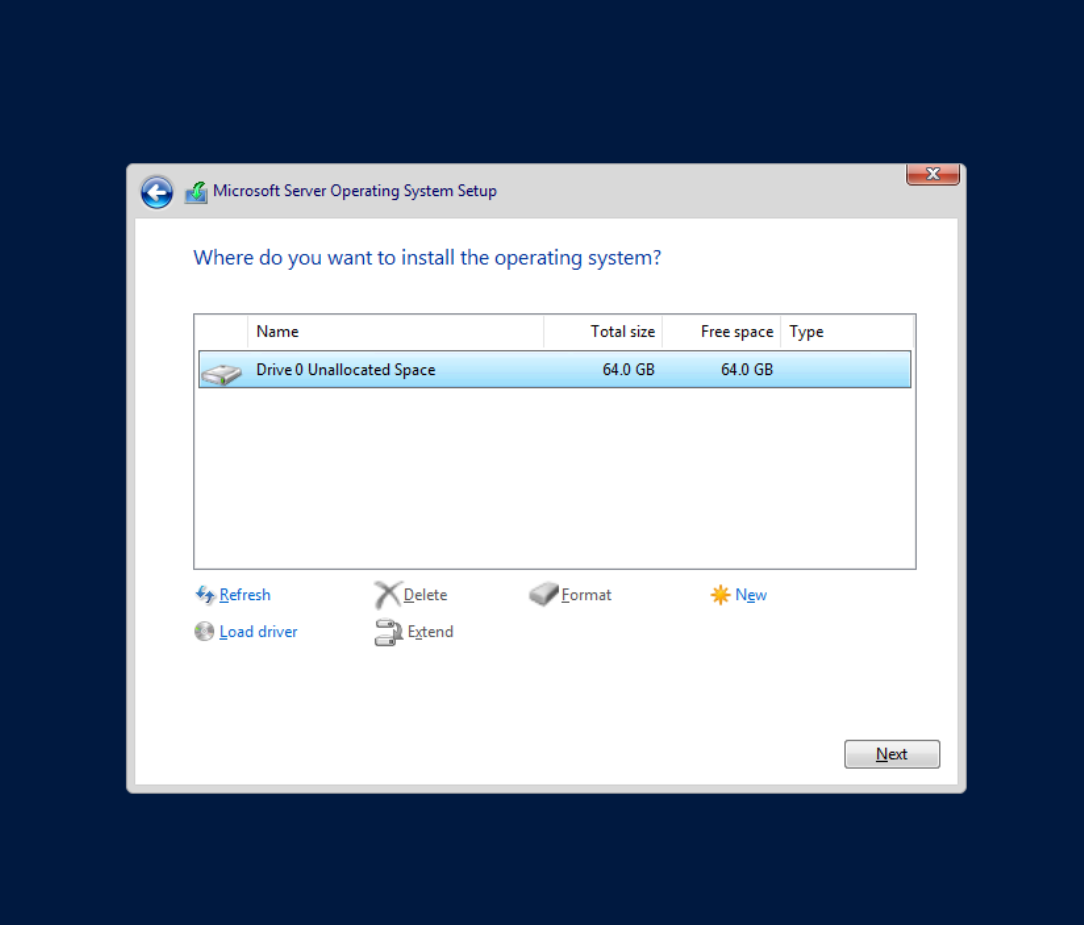
Follow the steps to install Windows until you get to the disk selection screen. You will notice that there are no drives to select! This is where the Virtio ISO comes in. Select the Load Drive button in the bottom left side:
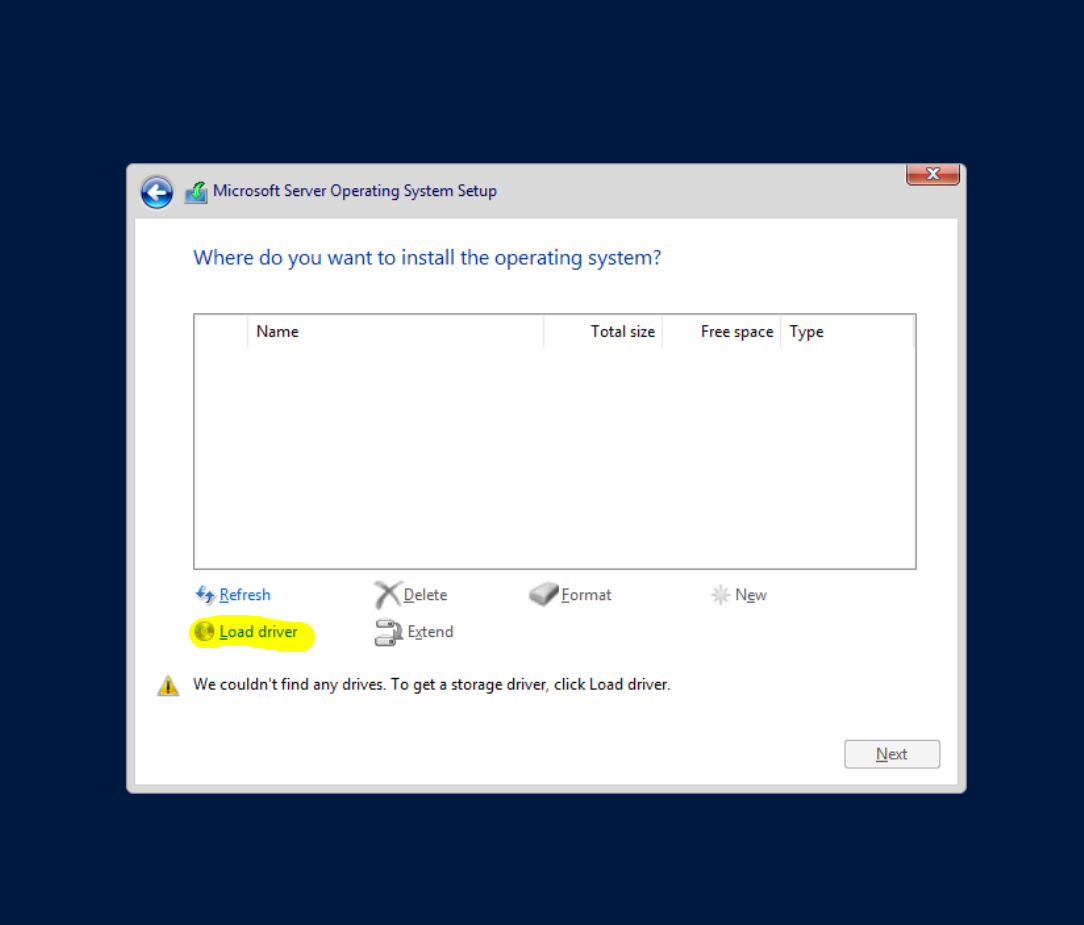
On the load driver prompt select Browse and the go to the follow folder: Virtio ISO> viosci> 2k22> amd64
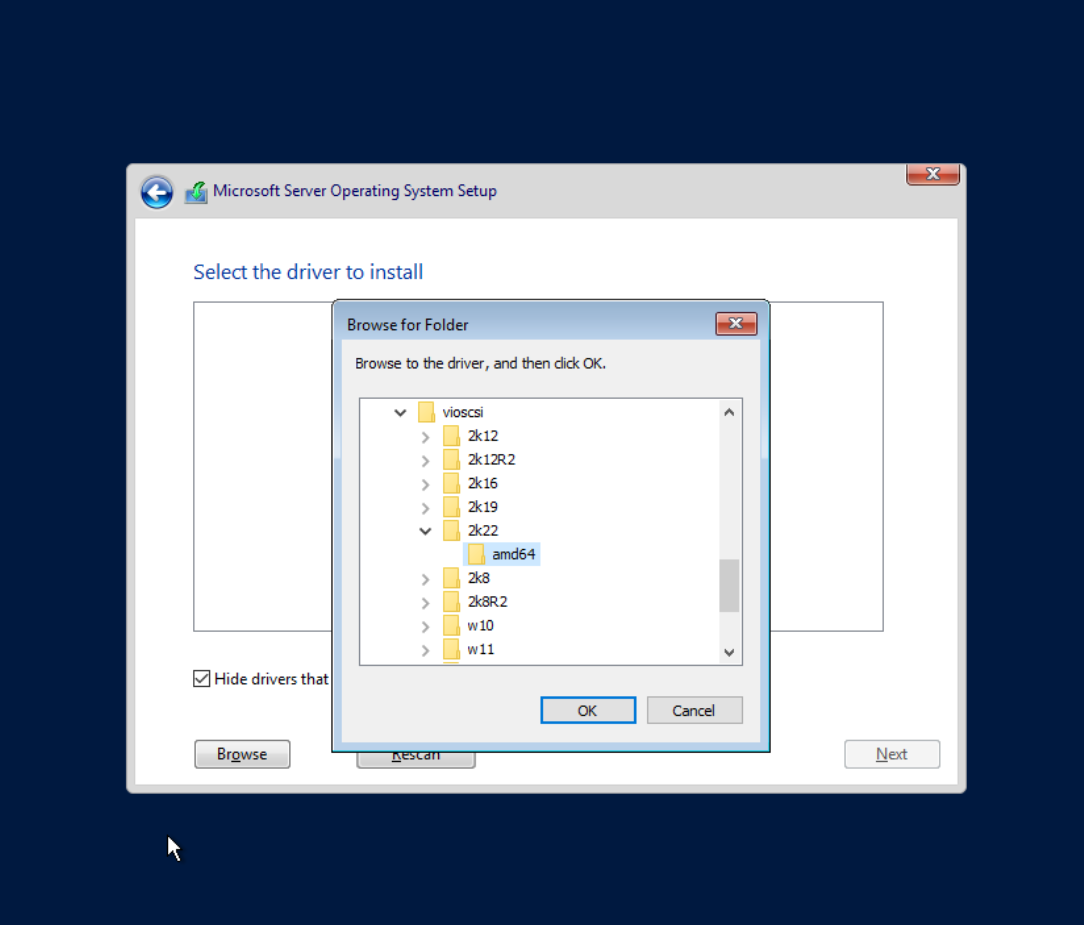
You should now see a Redhat VIRTIO SCSI pass-through controller driver. Click next to install the driver. After this driver is installed your hard drive will now be select-able in the Windows Installer! You can now complete your installation of Server 2022.
Once you're logged into your new Server 2022 installation, you will most likely notice some drivers missing if you open you Device Manager. Below is what my device manager looks like after a fresh install:
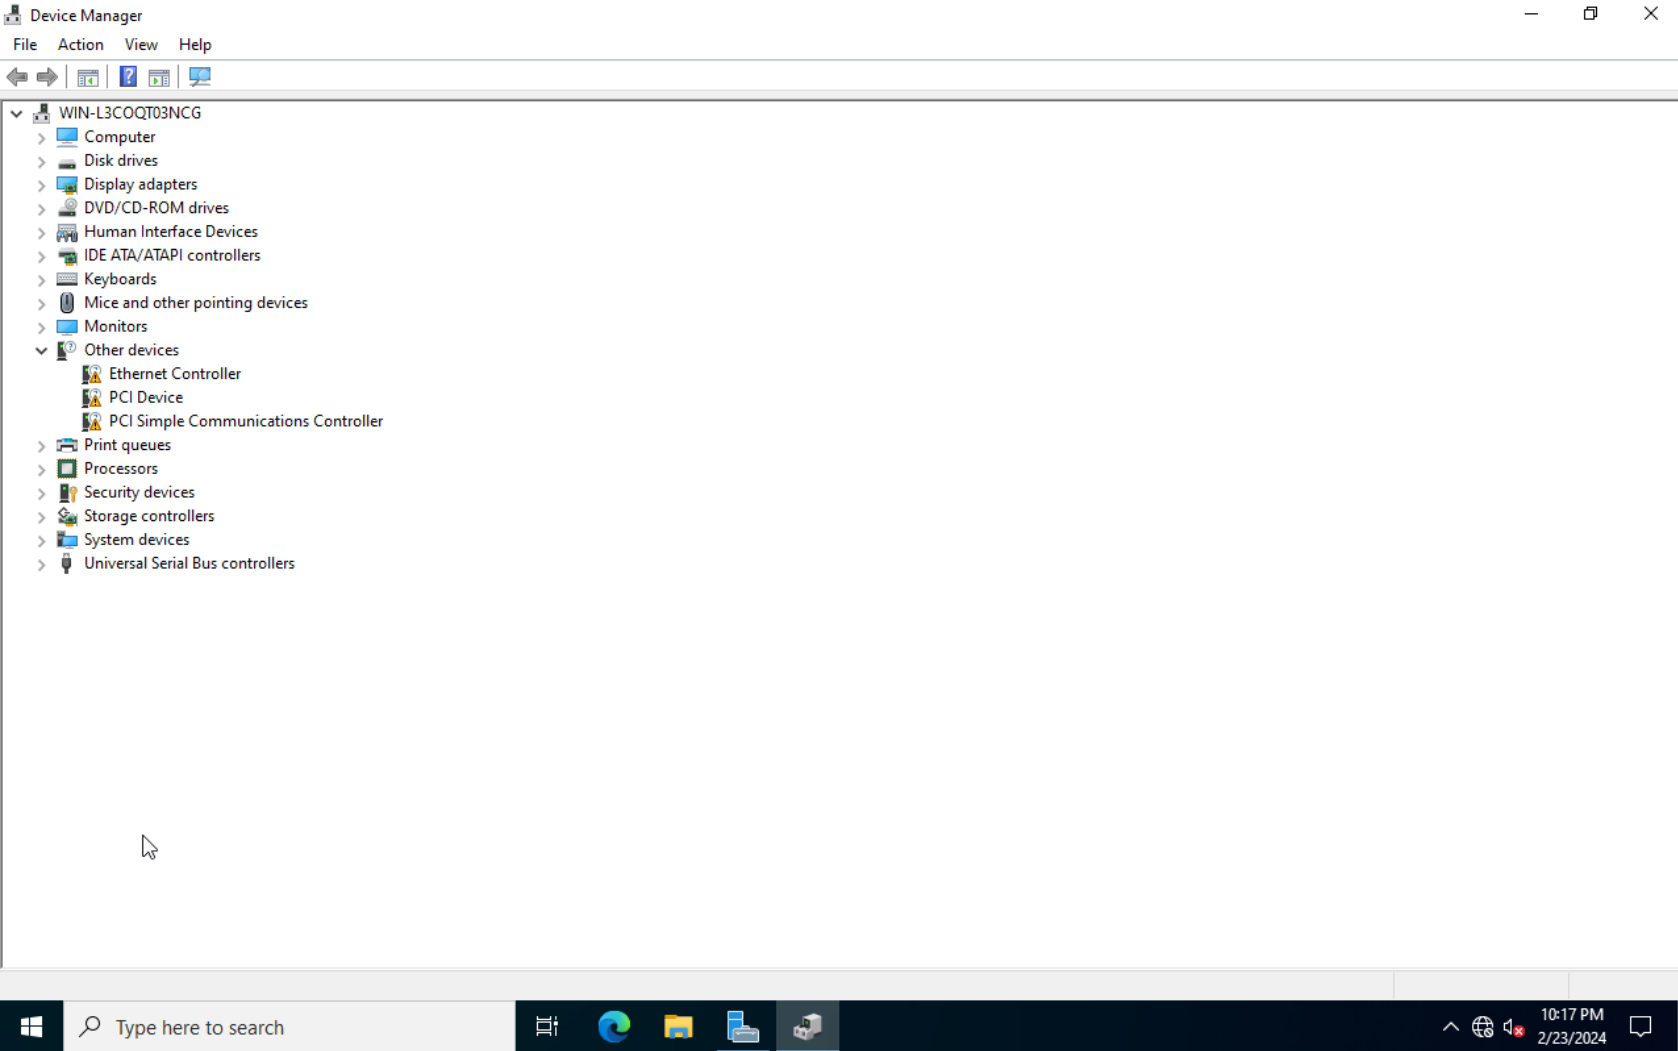
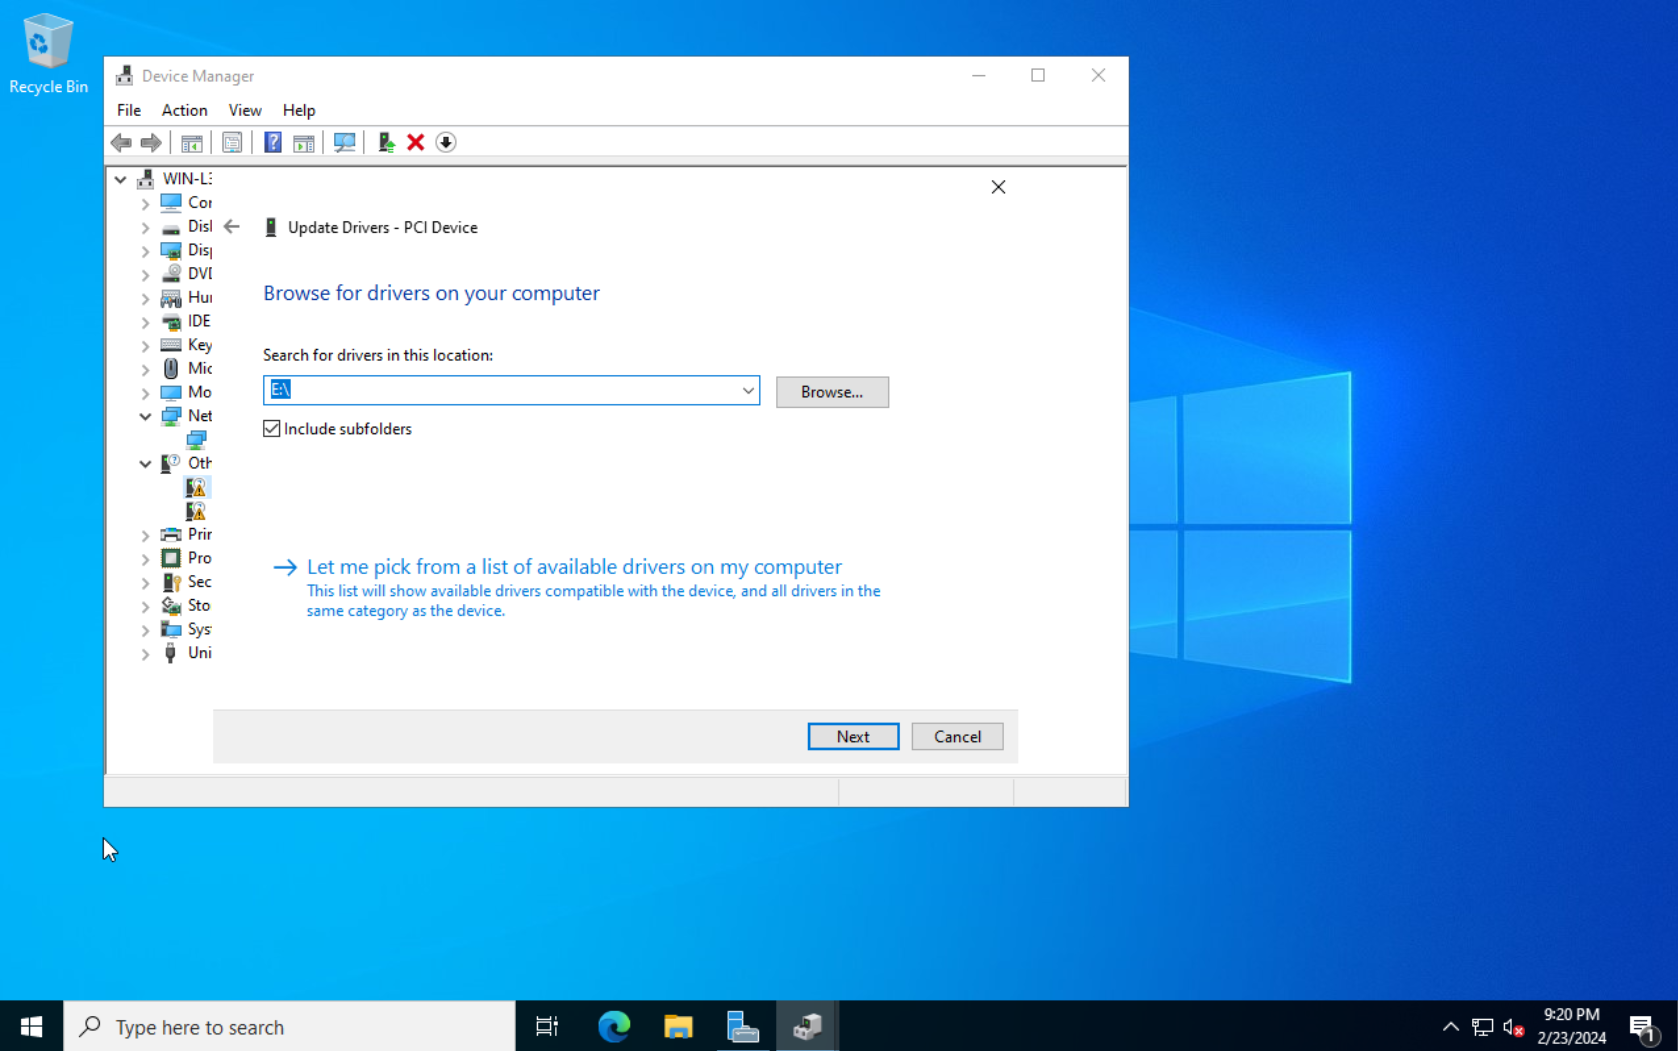
You can see that I am missing an Ethernet Controller, PCI Device and a PCI Simple Communications Controller. We will be using the Virtio ISO disk to install these missing drivers. Simply right-click on the driver you want to install and click on Update Drive, Browse my Computer, and then Browse again and find your Virtio ISO drive. If you don't see it check the hardware settings of the VM in Proxmox. You should be able to select the Virtio drive (in my case my E drive) and Windows will search all subfolders as long as that checkbox is selected:
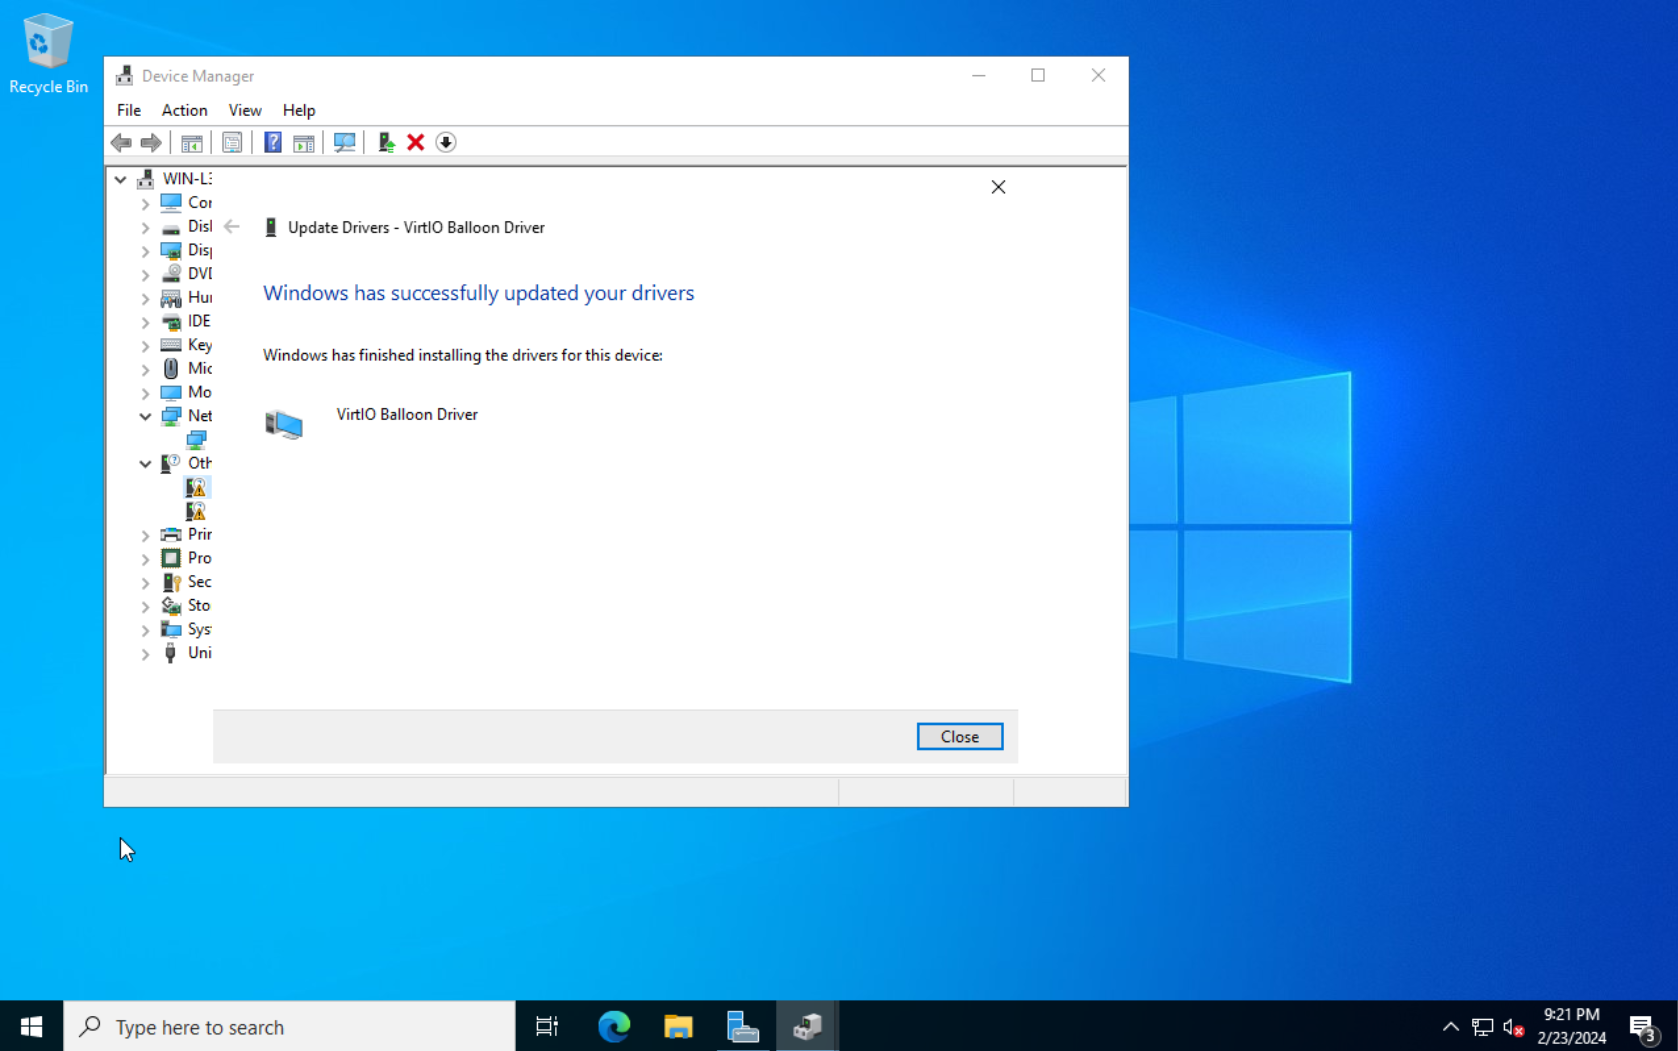
Click next and within seconds your driver will be installed!
Lastly, we will install the QEMU agent. This is also fairly simple to complete. Just follow the steps below:
- Open File Explorer
- Open the Virtio drive
- Find the folder called "guest-agent".
- Select the proper version to install. In my case I am selecting the 64-bit version.
And that's it! You have now successfully gone through the steps to install Server 2022 using Virtio drivers and a QEMU agent following the Proxmox recommendations.
For my next episode(s) I want to go through the Networking and Firewall settings within Proxmox. I want to do this to isolate my Homelab and do some networking tricks within my Homelabs own subnet. Make a server run NAT so all traffic goes through it etc etc. If you have any questions or comments on this last bonus episode please feel free to post a comment! I am hoping to make these updates more frequent as long as my work schedule and sickness in my home cooperate.
Thanks again for going on this adventure with me. Keep learning cool things nerdos!
Have a great weekend!